


In this article, I will show you how to build a radio broadcasting system with Express and React.
Our radio station will consist of 1 host and multiple listeners. The host streams their microphone to the server, which broadcasts to each listener. We can do this over WebSockets with socket.io. Also, the server loads music from a local folder to stream to the listeners over HTTP.
Building the Backend
To get started, we need to install the following packages from NPM.
npm i express react-feather jnaudiostream react-router-dom socket.io socket.io-client throttle uuid
Let's create an index.js file in a new folder named server. Here we will set up an Express app and wrap a socket.io server around it. Then we listen for a socket connection and define a route where clients can access the HTTP music stream.
import express from "express";
import http from "http";
import { Server as IOServer } from "socket.io";

const PORT = 3000;
const app = express();
const server = http.createServer(app);
const io = new IOServer(server);

(async () => {
    io.on("connection", (socket) => {
        console.log("New listener connected");
    });

    app.get("/stream", (req, res) => {
        res.status(200).json({Message: "Hello Radio!"});
    });

    server.listen(PORT, () => {
        console.log(`Listening on port ${PORT}`);
    });
})();

export {};
Live streaming audio
We'll create a Queue class to handle opening music files and streaming them to each client at the same rate. For this, we can create a file named queue.js in the same server folder.
Here are all the methods we will implement declared in Typescript style.
declare class Queue {
    constructor();
    broadcast(chunk: Buffer): void;
    addClient(): {
        id: string;
        client: PassThrough;
    };
    removeClient(id: string): void;
    loadTracks(dir: string): Promise<void>;
    getTrackBitrate(filepath: string): Promise<number>;
    getNextTrack(): {
        filepath: string;
        bitrate: number;
    };
    pause(): void;
    resume(): void;
    started(): boolean;
    play(useNewTrack?: boolean): void;
    loadTrackStream(): void;
    start(): Promise<void>;
}
Let's now break this all down.
Handling clients
We can create a PassThrough stream for each client where we can write the audio data, and the client can still read it.
We will also define a method to write a chunk of data to every connected client.
class Queue {
    constructor() {
        this.clients = new Map();
    }

    // ...

    broadcast(chunk) {
        this.clients.forEach((client) => {
            client.write(chunk);
        });
    }

    // ...
}
Loading files
We need a method to get the names of all the MP3 files in a directory and get their bitrates. Having the bitrate allows us to control the rate of audio streaming. Instead of handling the timing ourselves, we will use the Throttle package.
import { readdir } from "fs/promises";
import { extname, join } from "path";

class Queue {
    constructor() {
        this.clients = new Map();
        this.tracks = [];
    }

    // ...

    async loadTracks(dir) {
        let filenames = await readdir(dir);
        filenames = filenames.filter(
            (filename) => extname(filename) === ".mp3"
        );

        // Add directory name back to filenames
        const filepaths = filenames.map((filename) => join(dir, filename));

        const promises = filepaths.map(async (filepath) => {
            const bitrate = await this.getTrackBitrate(filepath);

            return { filepath, bitrate };
        });

        this.tracks = await Promise.all(promises);
        console.log(`Loaded ${this.tracks.length} tracks`);
    }

    // ...
}
And to get the bitrate, we'll use ffprobe via the @dropb/ffprobe wrapper. We must install that along with ffprobe-static, which will download the ffprobe binaries and return their location.
npm i ffprobe-static @dropb/ffprobe
Use the following code to implement the getTrackBitrate method:
import { ffprobe } from "@dropb/ffprobe";
import ffprobeStatic from "ffprobe-static";

ffprobe.path = ffprobeStatic.path;

class Queue {

    // ...

    async getTrackBitrate(filepath) {
        const data = await ffprobe(filepath);
        const bitrate = data?.format?.bit_rate;

        return bitrate ? parseInt(bitrate) : 128000;
    }

    // ...

}
Getting the next track
We use an index to know which track we should play next. By default, the index is 0.
getNextTrack() {
    // Loop back to the first track
    if (this.index >= this.tracks.length - 1) {
        this.index = 0;
    }

    const track = this.tracks[this.index++];
    this.currentTrack = track;

    return track;
}
Create a File Stream
We now use fs to create a read stream from the track's filepath.
loadTrackStream() {
    const track = this.currentTrack;
    if (!track) return;

    console.log("Starting audio stream");
    this.stream = createReadStream(track.filepath);
}
Spectacular streaming
Now we'll instantiate a new Throttle where we will pipe the file stream. The constructor for Throttle takes in bps (bytes per second), so we divide bitrate by 8.
Then we listen for the data event and call this.broadcast on every chunk received. We use the data event to send the data to multiple streams, as only one Writable can consume the typical .pipe.
And once there is no more data left, we start again by loading the next track, getting the stream and finally streaming.
async start() {
    const track = this.currentTrack;
    if (!track) return;

    this.playing = true;
    this.throttle = new Throttle(track.bitrate / 8);

    this.stream
        .pipe(this.throttle)
        .on("data", (chunk) => this.broadcast(chunk))
        .on("end", () => this.play(true))
        .on("error", () => this.play(true));
}
Controlling playback
To pause the playback, all we have to do is end the throttle. But we also have to remove the end listener to avoid this.play(true) being executed.
pause() {
    if (!this.started() || !this.playing) return;
    this.playing = false;
    console.log("Paused");
    this.throttle.removeAllListeners("end");
    this.throttle.end();
}
We also need a guard clause to check if a throttle exists and if we have loaded a track.
started() {
    return this.stream && this.throttle && this.currentTrack;
}
And now, to resume playback, we can use the call the start method we defined earlier.
resume() {
    if (!this.started() || this.playing) return;
    console.log("Resumed");
    this.start();
}
Finishing touches
We can now define the play method, which either resumes playback or starts playing the next track.
play(useNewTrack = false) {
    if (useNewTrack || !this.currentTrack) {
        console.log("Playing new track");
        this.getNextTrack();
        this.loadTrackStream();
        this.start();
    } else {
        this.resume();
    }
}
And in the file, we can export a singleton instance of Queue.
// ...

class Queue {
   // ...
}

const queue = new Queue();
export default queue;
The Server
Back in our main server file, we can import our queue, load the tracks and implement the /stream route, which pipes the PassThrough created by the queue to the HTTP response.
(async () => {
    await queue.loadTracks("tracks");
    queue.play();

    // ...

    app.get("/stream", (req, res) => {
        const { id, client } = queue.addClient();

        res.set({
            "Content-Type": "audio/mp3",
            "Transfer-Encoding": "chunked",
        }).status(200);

        client.pipe(res);

        req.on("close", () => {
            queue.removeClient(id);
        });
    });

    // ...

})()
Frontend routing
In the main.jsx file (if you're using Vite), we define three routes using react-router-dom.
// src/main.jsx

import React from "react";
import ReactDOM from "react-dom/client";
import Root from "./App";
import { createBrowserRouter, RouterProvider } from "react-router-dom";
import Host from "./routes/host";
import Listen from "./routes/listen";
import "./index.css";

const router = createBrowserRouter([
    {
        path: "/",
        element: <Root />,
    },
    {
        path: "/host",
        element: <Host />,
    },
    {
        path: "/listen",
        element: <Listen />,
    },
]);

ReactDOM.createRoot(document.getElementById("root")).render(
    <React.StrictMode>
        <RouterProvider router={router} />
    </React.StrictMode>
);
Root component
Our root component is simple. We place a header and create buttons to take the user to the other pages. Note that we use react-feather for icons and TailwindCSS for styling.
// src/App.jsx

import React from "react";
import { Link } from "react-router-dom";
import { Mic, Volume2 } from "react-feather";

const buttonClassName =
    "rounded-3xl p-4 w-full font-bold bg-gray-500 hover:bg-gray-400 border-4 border-gray-600 font-mono flex flex-row items-center";
const iconClassName = "p-3 bg-gray-600 mr-4 rounded-full inline";

function App() {
    return (
        <div className="flex flex-col items-center h-full">
            <h1 className="text-5xl font-bold mb-5">Radio Broadcast</h1>
            <div className="space-y-3 flex flex-col items-center w-max">
                <Link to="/host" className="w-full">
                    <button type="button" className={buttonClassName}>
                        <div className={iconClassName}>
                            <Mic size={32} />
                        </div>
                        Become the host
                    </button>
                </Link>
                <Link to="/listen" className="w-full">
                    <button type="button" className={buttonClassName}>
                        <div className={iconClassName}>
                            <Volume2 size={32} />
                        </div>
                        Tune in
                    </button>
                </Link>
            </div>
        </div>
    );
}

export default App;
Streaming microphone
To send the audio data to the server in real-time, we can use jnaudiostream, a package I published on NPM.
We can create a component (MicrophoneButton) that will communicate with the server using socket.io-client. Inside an effect, we can send the buffer header and subsequent data packets when they are received.
// src/components/MicrophoneButton.jsx

import React, { useEffect, useRef, useState } from "react";
import { Mic, MicOff } from "react-feather";
import { AudioRecorder } from "jnaudiostream";

export default function MicrophoneButton({ socket }) {
    const recorderRef = useRef(new AudioRecorder({}, 100)); // 1ms

    useEffect(() => {
        if (!socket) return;
        const recorder = recorderRef.current;

        recorder.onReady = (packet) => {
            console.log("Recording started!");
            console.log(packet);
            console.log("Header size: " + packet.data.size + "bytes");
            socket.emit("bufferHeader", packet);
        };

        recorder.onBuffer = (packet) => {
            socket.emit("stream", packet);
        };
    }, [socket]);

    // ...

}
Now we can add an onClick handler to the record button, which will toggle the recorder state. Here is the final code for the MicrophoneButton component.
import React, { useEffect, useRef, useState } from "react";
import { Mic, MicOff } from "react-feather";
import { AudioRecorder } from "jnaudiostream";

export default function MicrophoneButton({ socket }) {
    const [recording, setRecording] = useState(false);

    const recorderRef = useRef(new AudioRecorder({}, 100)); // 1ms

    useEffect(() => {
        if (!socket) return;
        const recorder = recorderRef.current;

        recorder.onReady = (packet) => {
            console.log("Recording started!");
            console.log(packet);
            console.log("Header size: " + packet.data.size + "bytes");
            socket.emit("bufferHeader", packet);
        };

        recorder.onBuffer = (packet) => {
            socket.emit("stream", packet);
        };
    }, [socket]);

    const onClickMic = () => {
        const recorder = recorderRef.current;
        setRecording(!recorder.recording);
        recorder.recording
            ? recorder.stopRecording()
            : recorder.startRecording();
    };

    const Icon = recording ? MicOff : Mic;

    const title = `${recording ? "Stop" : "Start"} recording`;

    return (
        <div className="flex flex-col items-center w-full">
            <button
                type="button"
                title={title}
                onClick={onClickMic}
                className="rounded-full p-5 bg-transparent border-2 border-blue-300 focus:border-red-600 hover:bg-gray-700"
            >
                <Icon size={64} className="color-white" />
            </button>
        </div>
    );
}
Socket.IO Server
On the server side, we can listen for the bufferHeader and stream events and broadcast the data to the other clients. We also listen for a control event which we'll use later.
// ...

io.on("connection", (socket) => {
    console.log("New listener connected");

    // Every new streamer must receive the header
    if (queue.bufferHeader) {
        socket.emit("bufferHeader", queue.bufferHeader);
    }

    socket.on("bufferHeader", (header) => {
        queue.bufferHeader = header;
        socket.broadcast.emit("bufferHeader", queue.bufferHeader);
    });

    socket.on("stream", (packet) => {
        // Only broadcast microphone if a header has been received
        if (!queue.bufferHeader) return;

        // Audio stream from host microphone
        socket.broadcast.emit("stream", packet);
    });

    socket.on("control", (command) => {
        switch (command) {
            case "pause":
                queue.pause();
                break;
            case "resume":
                queue.resume();
                break;
        }
    });
});

// ...
Music Control
Alongside recording the microphone, we need buttons to send commands to the socket.io server.
// src/components/MusicControls.jsx

import React from "react";
import { Play, Pause } from "react-feather";

const buttonClassName =
    "rounded-lg border-gray-200 bg-slate-700 hover:bg-slate-600 px-6 py-2";

export default function MusicControls({ socket }) {
    const execCommand = (command) => {
        socket.emit("control", command);
    };

    return (
        <div className="flex flex-col justify-center items-center w-full mt-8">
            <div className="flex flex-row justify-center space-x-3">
                <button
                    type="button"
                    onClick={() => execCommand("resume")}
                    className={buttonClassName}
                >
                    <Play size={28} />
                </button>
                <button
                    type="button"
                    onClick={() => execCommand("pause")}
                    className={buttonClassName}
                >
                    <Pause size={28} />
                </button>
            </div>
        </div>
    );
}
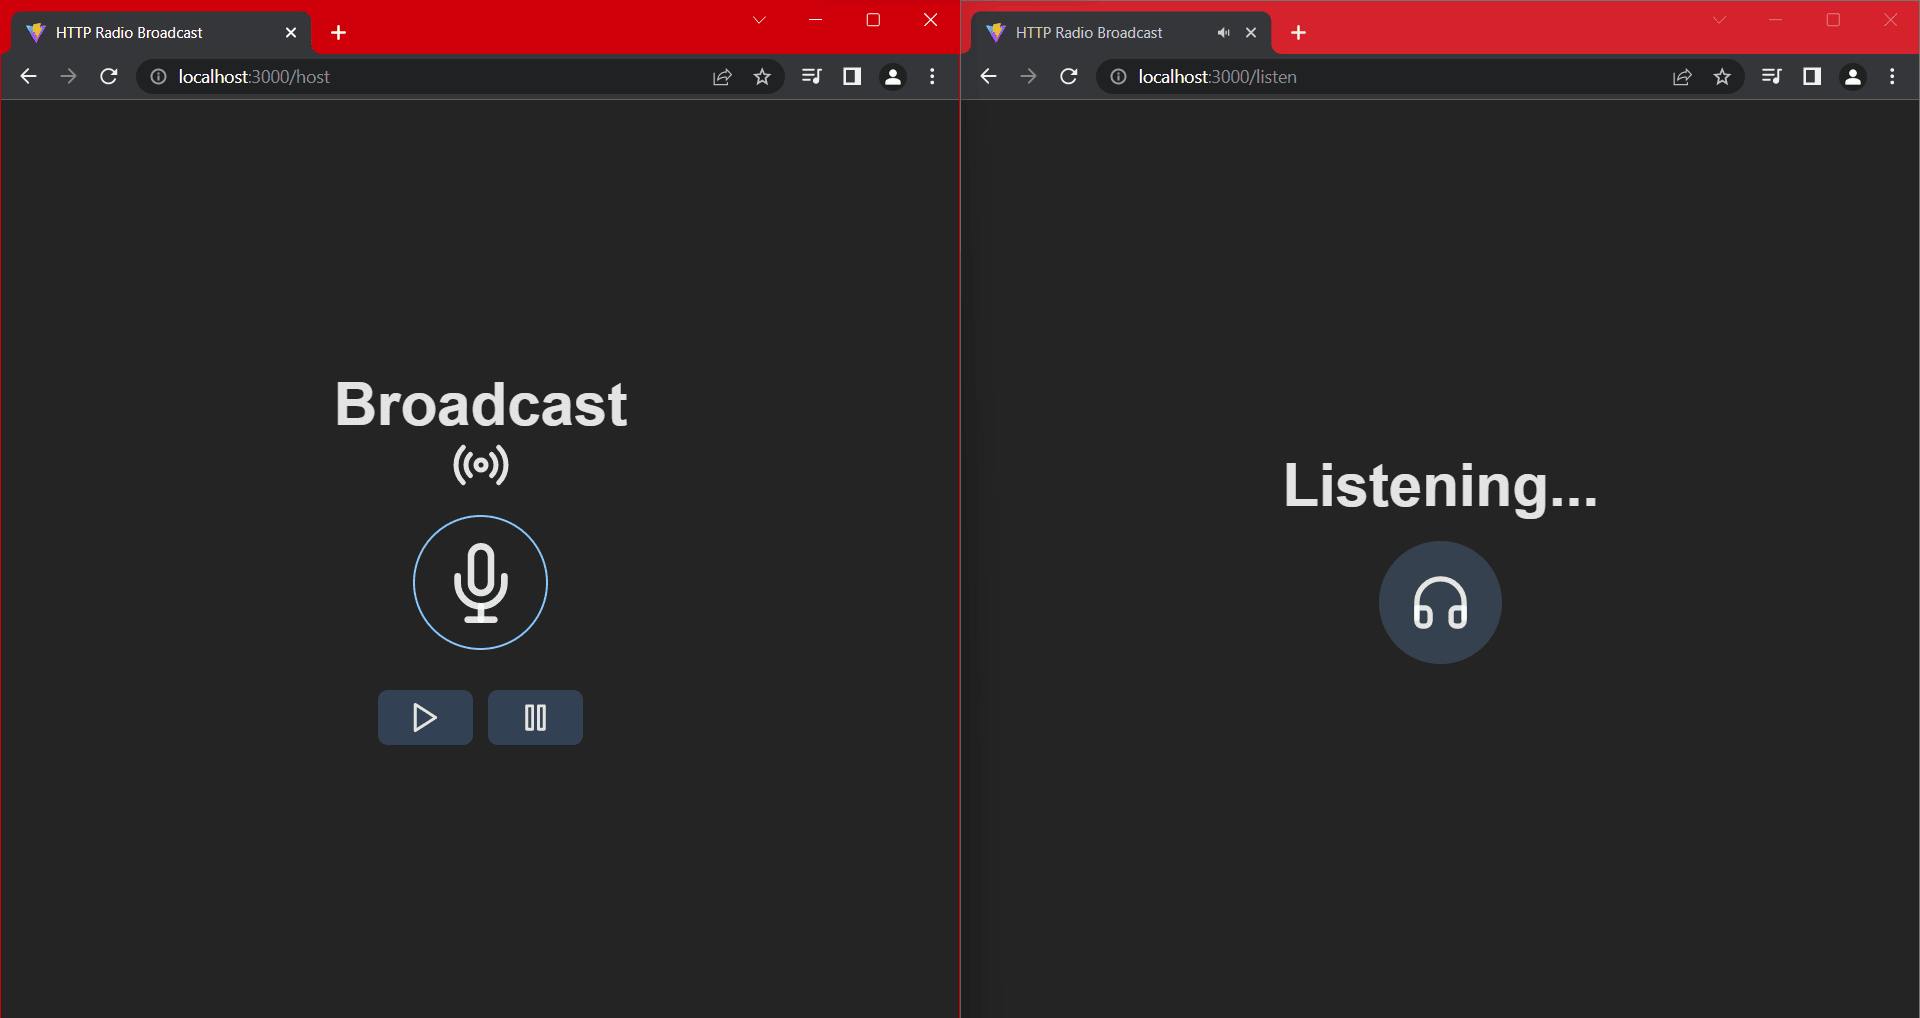
The Host route
And in our main component for the route, we can instantiate a client for socket.io. We connect to the base URL of the server.
// src/routes/host.jsx

import { useRef } from "react";
import MicrophoneButton from "../components/MicrophoneButton";
import MusicControls from "../components/MusicControls";
import { io } from "socket.io-client";
import { Radio } from "react-feather";

const URL = "http://localhost:3000";

function Host() {
    const socketRef = useRef(io(URL));

    return (
        <div className="flex flex-col items-center h-full">
            <h1 className="text-5xl font-bold">Broadcast</h1>
            <Radio size={48} className="mb-4" />
            <MicrophoneButton socket={socketRef.current} />
            <MusicControls socket={socketRef.current} />
        </div>
    );
}

export default Host;
By the way, if your frontend app and backend are on different ports (such as Vite on port 5173 and the Express app on port 3000), you will need to set a CORS property on the socket.io server.
const io = new IOServer(server, {
    cors: {
        origin: "http://localhost:5173",
    },
});
Tuning in
To fully listen to the broadcast, the user needs the host's microphone audio from socket.io and the HTTP stream for the music.
For tuning in to the host microphone, we can use the AudioStreamer class from jnaudiostream. We then listen for the bufferHeader and stream events to pass to the streamer object, similar to an example at the repository.
// src/hooks/useAudioStreamer.js

import { AudioStreamer } from "jnaudiostream";
import { useEffect, useRef } from "react";

const useAudioStreamer = (socket) => {
    const streamerRef = useRef(new AudioStreamer());

    useEffect(() => {
        const streamer = streamerRef.current;

        socket.on("bufferHeader", (packet) => {
            if (streamer.mediaBuffer) {
                return;
            }

            streamer.setBufferHeader(packet);
            streamer.playStream();
        });

        socket.on("stream", (packet) => {
            if (!streamer.mediaBuffer) {
                return;
            }
            streamer.receiveBuffer(packet);
        });

        return () => {
            socket.off("bufferHeader");
            socket.off("stream");
        };
    });
};

export default useAudioStreamer;
Note that streamer.mediaBuffer is available once we have set a header buffer.
And now, when listening to the HTTP music stream, we only use an audio element.
Add the following code to create the final route component.
// src/routes/listen.jsx

import { useRef } from "react";
import { io } from "socket.io-client";
import useAudioStreamer from "../hooks/useAudioStreamer";
import { Headphones } from "react-feather";

const URL = "http://localhost:3000";

function Listen() {
    const socketRef = useRef(io(URL));
    useAudioStreamer(socketRef.current);

    return (
        <div className="flex flex-col items-center h-full">
            <h1 className="text-5xl font-bold">Listening...</h1>
            <div className="rounded-full bg-gray-700 p-6 mt-5">
                <Headphones size={50} />
            </div>
            <audio src={`${URL}/stream`} autoPlay />
        </div>
    );
}

export default Listen;
Final notes
To summarise, we streamed audio from a host microphone and broadcast it to all connected listeners. Then we created a queue engine to handle streaming music to HTTP clients. Finally, we built an interface to tie everything together.
Here are some additional points to consider:
- Authorisation for hosts
- Adding or removing tracks from the queue
- Displaying the current track
- Allowing more than one queue (station)
Before you leave, you can find the entire code for this project here. Until next time.
References
github.com/WoolDoughnut310/jnaudiostream
socket.io/docs/v4/handling-cors
blog.logrocket.com/online-radio-server-pure..
github.com/michael-gillett/node-stream-player