

Build a Realtime Collaborative Code Editor with Svelte

I am a developer with 7 years of experience. At the moment I am working on building cool projects with JavaScript and the web for people to enjoy.
For this article, I decided to do things differently. ChatGPT gave me this headline, and I decided to stick with it.
So, today we will look further into the different aspects of a real-time code editor. This includes conflict resolution with operation transforms, syncing data with WebSockets, and user authentication.
This article will cover a range of topics, using different technologies. Feel free to follow along, or check out the GitHub repo linked at the end.
Initial Thoughts
Users of this application will want to create their own "projects" which would include multiple files. Within each file, we can store the filename and content. Users can have the basic functionality of opening, reading, editing and deleting project files. We can store all this data in a MongoDB database. Then, we can use Socket.IO to sync code changes to other users in the project.
Setting Up
Install Dependencies
First, we need to create a SvelteKit project, and then install the following packages from NPM:
npm create svelte@latest my-app
cd my-app

# Dependencies
# Auth
npm i simple-oauth2

# Database
npm i mongoose @typegoose/typegoose

# Sockets
npm i socket.io socket.io-client

# Editing
npm i svelte-simple-code-editor quill-delta prism-js
Styling
Run npm i svelte-feather-icons to provide icon components.
Our frontend will be styled with TailwindCSS, on top of flowbite-svelte , a UI library built on top of Tailwind classes. Follow the steps to get started with Flowbite Svelte.
Connecting to the Database
If you haven't already, create a MongoDB database, and save the connection URI in an environment variable. Remember to fill the connection string with the database user password, if needed.
Create a file named dbConnect.ts in the $lib/server folder which exports a dbConnect function, like in the NextJS Mongoose example. But make sure to import the connection string instead of using process.env :
Before -> process.env.MONGODB_URI
After -> import { MONGODB_URI } from '$env/static/private';
Then, we can add code to call this function inside of a server hook:
import dbConnect from '$lib/server/dbConnect';

await dbConnect();
Authentication (GitHub)
We will be using simple-oauth2 to authenticate users with the GitHub API. We need to register a new OAuth application.
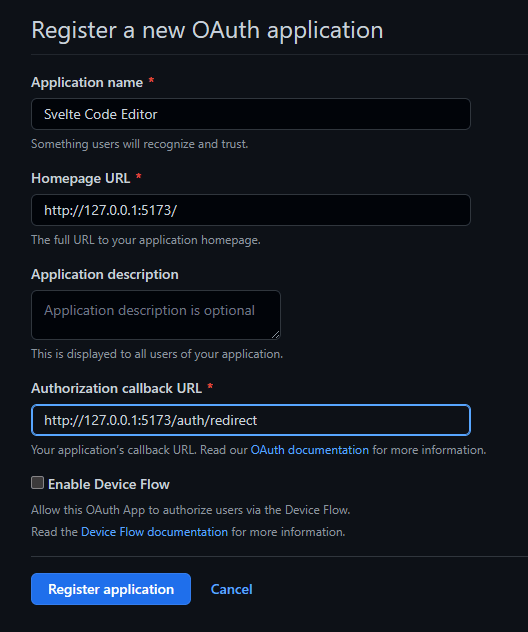
OAuth Client Setup
Now, generate a client secret and copy the client ID and secret into .env . Then, create a file named authClient.ts inside $lib/server , exporting an auth client and a function to get the currently authenticated user.
import { AuthorizationCode } from 'simple-oauth2';
import { GITHUB_CLIENT_ID, GITHUB_CLIENT_SECRET } from '$env/static/private';

export const client = new AuthorizationCode({
    client: {
        id: GITHUB_CLIENT_ID,
        secret: GITHUB_CLIENT_SECRET
    },
    auth: {
        tokenHost: 'https://github.com',
        tokenPath: '/login/oauth/access_token',
        authorizePath: '/login/oauth/authorize'
    }
});

export const getUser = async (accessToken: string) => {
    const res = await fetch('https://api.github.com/user', {
        method: 'GET',
        headers: {
            Authorization: `Bearer ${accessToken}`
        }
    });
    const data = await res.json();
    return data;
};
Auth Routes
The auth client provides methods to generate authorization URLs and get access tokens. We can first define the login page with an endpoint file, like so:
import { client } from '$lib/server/authClient';
import { redirect } from '@sveltejs/kit';
import type { RequestHandler } from './$types';

const authUrl = client.authorizeURL({
    redirect_uri: 'http://127.0.0.1:5173/auth/redirect'
});

export const GET = (() => {
    console.log(authUrl);
    throw redirect(302, authUrl);
}) satisfies RequestHandler;
The user is redirected to a GitHub login page
After authorising, they are taken to our redirect page
Now, we can use data returned from GitHub to get the user's info:
import { client, getUser } from '$lib/server/authClient';
import { error, redirect } from '@sveltejs/kit';
import type { RequestHandler } from './$types';

export const GET = (async ({ url, locals }) => {
    const code = url.searchParams.get('code');
    const err = url.searchParams.get('error');

    if (err) throw error(400, err);
    if (!code) throw error(400, 'no code specified');
    const { token } = await client.getToken({
        code,
        // eslint-disable-next-line @typescript-eslint/ban-ts-comment
        //@ts-ignore
        redirect_uri: undefined
    });

    if (token.error) {
        throw error(400, token.error);
    }

    const accessToken = token.access_token;

    // Get the authenticated user
    const user = await getUser(accessToken);

    locals.user = {
        avatar: user.avatar_url,
        username: user.login
    };

    throw redirect(307, '/');
}) satisfies RequestHandler;
Persist User Data
We can also add a handle function within our hook file to store the user in an HTTP cookie, as explained at Rodney Lab.
import type { Handle } from '@sveltejs/kit';
import type { RequestEvent } from './$types';

// ...

export const handle = (async ({ event, resolve }) => {
    const loggingOut = event.route.id === '/logout';

    const userString = event.cookies.get('user');

    event.locals.user = userString && JSON.parse(userString);

    const response = await resolve(event);

    const user = loggingOut ? '' : JSON.stringify(event.locals.user);

    const secure = process.env.NODE_ENV === 'production';
    const maxAge = 7_200; // (3600 seconds / hour) * 2 hours
    const sameSite = 'Strict';
    const cookieHeader = `user=${user || ''}; Max-Age=${maxAge}; Path=/; ${
        secure ? 'Secure;' : ''
    } HttpOnly; SameSite=${sameSite}`;
    response.headers.set('Set-Cookie', cookieHeader);

    return response;
}) satisfies Handle;
And then, the user data can be shared across all pages within a top-level layout file. Add the following code to src/+layout.server.ts :
import type { LayoutServerLoad } from './$types';

export const load = (async ({ locals }) => {
    return {
        session: {
            user: locals.user
        }
    };
}) satisfies LayoutServerLoad;
So, now we can access the session data in our routes, what's next?
Database Models
Since we installed typegoose, we can create mongoose models in one step. The library uses the ES6 classes to generate type interfaces automatically.
import type { Types } from 'mongoose';
import {
    getModelForClass,
    prop,
    type DocumentType,
    defaultClasses,
    PropType
} from '@typegoose/typegoose';
The first of 3 classes will be to represent users of our application.
export class User {
    @prop({ type: String, required: true })
    public username!: string;
    @prop({ type: String })
    public avatar?: string;
}
The next will represent users' files. For reasons explained later, we will store the file content as an array of operations.
export class File {
    @prop({ required: true, type: () => String })
    public name!: string;

    @prop({ type: () => [Object] })
    public content!: { [key: string]: unknown }[];
}
And now we can define and compile the model to represent a code project.
// eslint-disable-next-line @typescript-eslint/no-empty-interface
export interface ProjectClass extends defaultClasses.Base {}
export class ProjectClass {
    @prop({ required: true, type: () => User })
    public creator!: User;

    @prop({ required: true, type: String })
    public name!: string;

    @prop({ type: () => [FileClass], required: true }, PropType.ARRAY)
    public files!: Types.DocumentArray<DocumentType<FileClass>>;
}

export const Project = getModelForClass(ProjectClass);
Note the interface defined above the class. The Base interface adds the _id fields to the class.
SocketIO
Any changes made to code files will be sent to other users through WebSockets, namely SocketIO.
To add real-time communication to our app, we can create a Vite plugin. The configureServer hook provides access to Vite's internal connect app, which we then wrap with a SocketIO server.
import { Server } from 'socket.io';
import type { PluginOption } from 'vite';
import handler from './handler';

const plugin: PluginOption = {
    name: 'sveltekit-socket-io',
    configureServer: (server) => {
        if (!server.httpServer) return;

        const io = new Server(server.httpServer);

        handler(io);
    }
};

export default plugin;
And now we can add our new plugin to vite.config.ts:
import { sveltekit } from '@sveltejs/kit/vite';
import type { UserConfig } from 'vite';
import socketio from './src/lib/server/socket/plugin';

const config: UserConfig = {
    plugins: [sveltekit(), socketio]
};

export default config;
Socket Events
We will now lay out handler functions for the SocketIO server.
import Delta from 'quill-delta';
import { Project } from '../models';
import type { Server } from './types';

export default function handler(io: Server) {
    io.use(async (socket, next) => {
        // Before a client connects
    });

    io.on('connection', async (socket) => {
        // When a client connects
    });
}
First, clients will need to send the ID for the project they want to work on. To validate whether the given project exists, we can use a middleware function.
io.use(async (socket, next) => {
    const user = socket.handshake.auth.user;
    const projectId = socket.handshake.auth.projectId;
    const project = await Project.findById(projectId);

    if (!project) {
        const error = new Error('project not found');
        return next(error);
    }

    socket.data.project = project;
    socket.data.user = user;
    next();
});
And once a client does connect, we can retrieve the stored project document, and add them to a room.
io.on('connection', async (socket) => {
    const project = socket.data.project;
    const user = socket.data.user;

    if (!(project && user)) {
        return socket.disconnect();
    }

    const projectId = project._id.toString();
    socket.join(projectId);

    // ...
});
User Presences
Once a user connects, we can send them data about every other user connected to the same project.
const otherSockets = await io.in(projectId).fetchSockets();
const users = otherSockets.map((socket) => socket.data.user);

socket.emit('users', users);
We can also send the current user's data so that all other users are aware.
socket.to(projectId).emit('join', user);

socket.on('disconnect', () => {
    socket.to(projectId).emit('leave', user.username);
});
Operational Transforms
One of the main issues when building collaborative editing systems is resolving conflicts. Many different solutions exist, but the one we will use, also used very widely today, is operational transforms.
For this to work, once users make any change, their update is "transformed" against awaited remote changes. This means every user's code will have the same content.
We can begin by implementing the way changes will be received on the server.
socket.on('change', async (filename, change) => {
    const file = project.files.find((file) => file.name === filename);

    if (!file) {
        return;
    }

    let doc = new Delta(file.content);
    doc = doc.compose(change);

    file.content = doc.ops;

    await project.save();

    socket.to(projectId).emit('change', filename, change);
});
Here, we take the change which is a Delta object and "apply" it to a Delta of the file content from the database. Remember how we defined the file contents as an array of objects?
Note that we use the Delta class from quill-delta , a library that implements the features of operational transforms.
Index Page
Our main page will include options to either create a new project or join an existing project. We will use form actions to take input from the user.
Form Actions
So, we can start by adding the following code to the top level +page.server.ts. In both actions, we redirect the user to the project's route:
import { Project } from '$lib/server/models';
import { redirect } from '@sveltejs/kit';
import type { Actions } from './$types';

export const actions = {
    create: async ({ request, locals }) => {
        const data = await request.formData();
        const value = data.get('value');

        const project = new Project({
            creator: locals.user,
            name: value,
            files: [],
        });

        await project.save();

        throw redirect(303, `/project/${project._id}`);
    },
    join: async ({ request }) => {
        const data = await request.formData();
        const value = data.get('value');

        throw redirect(303, `/project/${value}`);
    }
} satisfies Actions;
Svelte Code
Here is the starter code for the +page.svelte. For now, we render a header.
<script lang="ts">
    import { Avatar, Button, Heading, Input } from 'flowbite-svelte';
    import { GithubIcon, ArrowRightIcon, PlusCircleIcon, LogInIcon } from 'svelte-feather-icons';
    import type { PageData } from './$types';

    export let data: PageData;
</script>

<main class="w-full dark h-full flex flex-col justify-center items-center">
    <header class="text-center mb-5">
        <Heading tag="h1">Code Editor</Heading>
        <Heading tag="h6">Made with Svelte</Heading>
    </header>
    <!-- ... -->
</main>

<style lang="postcss">
    :global(body, html) {
        width: 100%;
        height: 100%;
        background: theme(backgroundColor.stone.800);
    }
</style>
And now we can check if the user has authenticated, to either show the buttons described earlier or a login button.
{#if data.session.user}
    {@const user = data.session.user}
    <!-- ... -->
{:else}
    <Button href="auth" color="light">
        <GithubIcon size="24" />
        <span class="ml-1">Login</span>
    </Button>
{/if}
And as for the markup rendered when there is a user...
We can render their name and avatar, as provided by GitHub:
<div class="text-gray-800 p-3 rounded-xl border-2 border-white bg-gray-300 flex flex-row space-x-2">
    <Avatar src={user.avatar} rounded />
    <span>{user.username}</span>
</div>
Then add a button to toggle between entering the name for a new project and the ID for an existing one:
<Button on:click={toggleCreate} outline gradient color="greenToBlue" btnClass="mt-6">
    <svelte:component this={ActionIcon} />
    <span class="ml-2">{label}</span>
</Button>
And later the actual form to submit to the server:
<form method="POST" action={`?/${formaction}`} class="space-y-2 mt-5 flex flex-col">
    <Input type="text" name="value" bind:value required {placeholder} size="lg" />
    {#if value.length > 0}
        <Button type="submit" gradient class="!p-2" color="tealToLime"><ArrowRightIcon /></Button>
    {/if}
</form>
Now, back to the <script> at the top of the file. We need to know when either creating or joining has been toggled, to know which label, icon or placeholder to render.
let value = '';
let creating = false;

const toggleCreate = () => (creating = !creating);

$: placeholder = creating ? 'Enter new project name' : 'Enter project ID';
$: label = creating ? 'Join Project' : 'New Project';
$: ActionIcon = creating ? LogInIcon : PlusCircleIcon;
$: formaction = creating ? 'create' : 'join';
Project Route
As hinted at before, the files for this route will be put in src/routes/project/[project] .
Again, here we will use form actions. But first, we can create a server load function. With this, the front end can receive the project's data.
import { Project, ProjectClass } from '$lib/server/models';
import { error, fail, redirect } from '@sveltejs/kit';
import type { PageServerLoad, Actions } from './$types';
import { EJSON } from 'bson';

export const load = (async ({ params, locals }) => {
    const project = await Project.findById(params.project).lean();

    if (!locals.user) {
        throw redirect(307, '/');
    }

    if (!project) {
        throw error(404, 'not found');
    }

    return {
        project: EJSON.serialize(project) as ProjectClass
    };
}) satisfies PageServerLoad;
Note that we use EJSON to handle serializing ObjectIDs from mongoose.
Actions
We will need form actions to create, rename and delete files.
Create File
When creating a file, we first check if the project exists, and then if a valid and unique filename has been entered.
createFile: async ({ request, params }) => {
    const project = await Project.findById(params.project);
    if (!project) {
        return fail(404, { message: 'not found' });
    }

    const data = await request.formData();
    const filename = data.get('filename');

    if (typeof filename !== 'string') {
        return fail(400, { message: 'invalid filename type' });
    }

    if (project.files.map((file) => file.name).includes(filename)) {
        return fail(400, { filename, message: 'file already exists' });
    }

    project.files.push({ name: filename, content: [] });
    await project.save();
},
Rename File
Renaming files requires a file's ID, as well as the new value.
renameFile: async ({ request, params }) => {
    const project = await Project.findById(params.project);
    if (!project) {
        return fail(404, { message: 'not found' });
    }

    const data = await request.formData();

    const id = data.get('id');
    const value = data.get('value');

    if (!(typeof id === 'string' && typeof value === 'string')) {
        return fail(400, { message: 'invalid id type' });
    }

    const file = project.files.id(id);

    if (!file) {
        return fail(404, { message: 'not found' });
    }

    file.name = value;

    await project.save();
},
Delete File
Here, we get the file by its ID so that we can remove the file.
deleteFile: async ({ request, params }) => {
    const project = await Project.findById(params.project);
    if (!project) {
        return fail(404, { message: 'not found' });
    }

    const data = await request.formData();

    const id = data.get('id');

    if (typeof id !== 'string') {
        return fail(400, { message: 'invalid id type' });
    }

    project.files.id(id)?.remove();
    await project.save();
}
Svelte Code
Add the following code to the adjacent +page.svelte:
<script lang="ts">
    import { setContext } from 'svelte';
    import type { PageData } from './$types';

    import { Types } from 'mongoose';
    import io from 'socket.io-client';

    import FileTabs from '$lib/components/FileTabs.svelte';
    import RenameFile from '$lib/components/RenameFile.svelte';
    import DeleteFile from '$lib/components/DeleteFile.svelte';
    import CreateFile from '$lib/components/CreateFile.svelte';
    import UsersList from '$lib/components/UsersList.svelte';
    import { project } from '$lib/stores';

    export let data: PageData;

    // ...
</script>

<main class="w-full h-full flex flex-col justify-center items-center">
    <div class="w-5/6 flex flex-row justify-around mb-10">
        <div>
            <RenameFile />
            <DeleteFile />
        </div>
        <UsersList />
        <CreateFile />
    </div>
    <div class="w-5/6 h-3/4 relative">
        <FileTabs />
    </div>
</main>

<style global>
    :global(html, body) {
        width: 100%;
        height: 100%;
    }
</style>
The imports and markup structure here pretty much describes how the page may look.

This represents the components in the first row, but we use the FileTabs component to render the input area and show syntax highlighting.
Deserializing Page Data
Note that we can't just use the data prop to access the project data. When creating or renaming files, we may want to add progressive enhancements. This allows client-side JavaScript to submit the form, i.e. fetch. This means thepage store will update, but the data prop won't also update. Therefore, we will only access the project data using stores.
We also may need to access the deserialised data in multiple components. So let's create a stores.ts file in the $lib folder. It will contain a store that derives from the page store.
import { derived } from 'svelte/store';
import type { ProjectClass } from '$lib/server/models';
import { page } from '$app/stores';
import { EJSON } from 'bson';

export const project = derived<typeof page, ProjectClass>(
    page,
    ($page) => EJSON.deserialize($page.data.project) as ProjectClass
);
SocketIO Client
Now we can initialize a client for our Socket server. Note that we need to do a handshake with the project ID and user data.
const socket = io({
    auth: {
        projectId: project._id.toString(),
        user: data.session.user
    }
});
Context
Data can be passed to children of the page component via context. We can socket client instance.
setContext('socket', socket);
Main Application State
// Currently opened file
let fileId = project.files[0]?._id ?? new Types.ObjectId();

// Used to access the file's other properties
$: file = project.files.find((file) => file._id.equals(fileId));

// id (id of file to rename), value (new value)
let editing = {
    id: new Types.ObjectId(),
    value: ''
};
So now we can update our markup to include these state variables:
<main class="w-full h-full flex flex-col justify-center items-center">
    <div class="w-5/6 flex flex-row justify-around mb-10">
        <div>
            <RenameFile on:click={() => (editing = { id: fileId, value: file?.name ?? '' })} />
            <DeleteFile {fileId} />
        </div>
        <UsersList />
        <CreateFile />
    </div>
    <div class="w-5/6 h-3/4 relative">
        <FileTabs {editing} {fileId} />
    </div>
</main>
Application Elements
Rename File
An icon button that forwards an on:click handler:
<script lang="ts">
    import { Button } from 'flowbite-svelte';
    import { EditIcon } from 'svelte-feather-icons';
</script>

<Button on:click title="Rename file" color="yellow" pill><EditIcon /></Button>
Delete File
Uses the active file to fill a form that would submit data to the deleteFile action:
<script lang="ts">
    import { Button } from 'flowbite-svelte';
    import type { Types } from 'mongoose';
    import { TrashIcon } from 'svelte-feather-icons';

    export let fileId: Types.ObjectId;
</script>

<form method="POST" action="?/deleteFile" class="inline">
    <Button type="submit" title="Delete file" shadow="pink" color="red" pill>
        <TrashIcon />
    </Button>
    <input type="text" hidden name="id" value={fileId.toString()} />
</form>
Users List
Here, we listen to the user management events from the server. The avatar for each user is displayed, along with a tooltip showing their name.
<script lang="ts">
    import type { User } from '$lib/server/models';
    import type { Client } from '$lib/server/socket/types';
    import { Avatar, Tooltip } from 'flowbite-svelte';
    import { getContext, onMount } from 'svelte';

    const socket = getContext<Client>('socket');

    let users: User[] = [];

    onMount(() => {
        socket.on('users', (data) => (users = data));
        socket.on('join', (user) => {
            users = [...users, user]
        });
        socket.on('leave', (username) => {
            users = users.filter((user) => user.username !== username);
        });
    });
</script>

<div class="flex flex-row px-4 py-2 max-w-3xl space-x-3">
    {#each users as user (user.username)}
        <Avatar src={user.avatar} data-name={user.username} rounded border />
    {/each}

    {#if users.length > 0}
        <Tooltip triggeredBy="[data-name]" on:show={(e) => (name = e.target.dataset.name)}>
            {name}
        </Tooltip>
    {/if}
</div>
The file containing the Client interface is available in the GitHub repository, for reference.
Create File
A button that triggers a popover. The popover contains an input to enter the new filename.
<script lang="ts">
    import { Button, Popover, Input } from 'flowbite-svelte';
    import { enhance } from '$app/forms';
    import { PlusCircleIcon } from 'svelte-feather-icons';
</script>

<Button id="create-file" title="Create file" shadow="cyan" pill>
    <PlusCircleIcon />
</Button>
<Popover triggeredBy="#create-file" placement="bottom" class="w-48 h-16" trigger="click">
    <form method="POST" use:enhance action="?/createFile">
        <Input type="text" name="filename" placeholder="Name" />
    </form>
</Popover>
File Tabs
Separate tab items for each file within the project. Each tab item will render an Editor component which contains the contents of the file, for editing.
For every tab item, we use the title slot to control whether an input for renaming or the regular filename should be rendered.
<script lang="ts">
    import { Tabs, TabItem, Input, Heading } from 'flowbite-svelte';
    import Editor from './Editor.svelte';
    import { applyAction, deserialize } from '$app/forms';
    import { invalidateAll } from '$app/navigation';
    import type { ActionResult } from '@sveltejs/kit';
    import { Types } from 'mongoose';
    import { project } from '$lib/stores';

    export let fileId: Types.ObjectId;

    export let editing: {
        id: Types.ObjectId;
        value: string;
    };
</script>

<Tabs contentClass="h-full overflow-auto text-lg bg-gray-800 text-white rounded-2xl relative">
    {#each $project.files as file (file._id.toString())}
        <TabItem open={file._id.equals(fileId)} on:click={() => (fileId = file._id)} title={file.name}>
            <div slot="title">
                {#if editing.id.equals(file._id)}
                    <Input type="text" on:blur={() => renameFile()} name="value" bind:value={editing.value} />
                {:else}
                    {file.name}
                {/if}
            </div>
            <Editor {file} />
        </TabItem>
    {:else}
        <TabItem open title="New">
            <div class="flex flex-col space-y-6 justify-center items-center">
                <Heading tag="h3" color="white" class="text-center mt-24">
                    Create a new File
                </Heading>
                <img src="/favicon.png" alt="Svelte Icon" />
            </div>
        </TabItem>
    {/each}
</Tabs>
Notice the renameFile function called, which we have not yet defined. Before we were able to make use of a <form> component. But now, the <input> is inside a <TabItem> , which is a button. This prevents users from submitting forms by pressing 'Enter' within the <input>.
The implementation for renameFile comes from the SvelteKit docs. The difference is that we construct a FormData object ourselves.
const renameFile = async () => {
    const data = new FormData();
    data.set('id', editing.id.toString());
    data.set('value', editing.value);

    const response = await fetch('?/renameFile', {
        method: 'POST',
        body: data
    });

    const result: ActionResult = deserialize(await response.text());

    if (result.type === 'success') {
        await invalidateAll();
        editing = {
            id: new Types.ObjectId(),
            value: ''
        };
    }

    applyAction(result);
};
Editor
This component ties in with the change events from the server. Then, it implements the process for operational transforms on code content. We also use a SimpleCodeEditor component to render the code and syntax highlighting.
Add the following imports to the component script:
<script lang="ts">
    import { getContext, onMount } from 'svelte';

    import type { Client } from '$lib/server/socket/types';
    import type { File } from '$lib/server/models';

    import { SimpleCodeEditor } from 'svelte-simple-code-editor';
    import Delta from 'quill-delta';

    import Prism from 'prismjs';
    import 'prismjs/themes/prism-tomorrow.css';

    export let file: File;
</script>

<div>
    <SimpleCodeEditor
        bind:value={code}
        highlight={(code) => Prism.highlight(code, Prism.languages.javascript, 'javascript')}
        tabSize={4}
        on:value-change={onChange}
    />
</div>
Note that we're only highlighting using "javascript". In reality, not all files created are going to be JavaScript files. As a suggestion, you could use guess-lang to detect the language. Then, you would pass the language name and grammar into the highlight function. This would allow the coding language to be detected without relying on its file extension. A post on this topic may come soon.
Now we can get the socket client, provided by context.
const socket = getContext<Client>('socket');
And then define some important state variables.
// Code content reflected in the DOM
let code = file.content.length ? (file.content[0].insert as string) : '';

// Used to compare with new code, during updates
let previousCode = code;

// Stores all the changes applied
let localChanges: Delta[] = [];

let timeout = setTimeout(() => {}, 0);

// Stores the initial change
// e.g. an update from the server
// or the last local change applied
let initialChange = new Delta();
Once the component mounts, we can listen for the change event. Here, we set the initialChange to this remote change. Then, applyLocalChanges applies the changes, along with any pending local changes.
onMount(() => {
    socket.on('change', (filename, change) => {
        if (filename !== file.name) return;
        initialChange = new Delta(change);

        applyLocalChanges();
    });
});
Before calling applyLocalChanges we can wait for any updates from the server.
const onChange = () => {
    localChanges = [
        ...localChanges,
        new Delta().insert(previousCode).diff(new Delta().insert(code))
    ];
    previousCode = code;

    clearTimeout(timeout);
    timeout = setTimeout(applyLocalChanges, 1000);
};
To transform the local changes against the remote update, we must first compose each local change into one Delta object.
const applyLocalChanges = () => {
    let final = initialChange;

    if (localChanges.length) {
        let cumulated = localChanges.reduce((prev, cur) => prev.compose(cur));

        const transformed = final.transform(cumulated, true);

        // initial + cumulated
        final = final.compose(transformed);

        final = cumulated.invert(new Delta()).compose(final);
    }

    // ...
};
As the user types into the editor, they see their local changes since the code variable is bound to the input component. So, we have to "invert" the cumulated change first so that those local changes are removed from code.
Now, at the end of the function, we apply these composed updates:
// Apply final change
const newDoc = new Delta().insert(code).compose(final);

// If new code is empty after operations,
// newDoc.ops will be empty
if (newDoc.length() === 0) {
    code = '';
} else {
    code = (newDoc.ops[0]?.insert as string) ?? '';
}

previousCode = code;

initialChange = new Delta();
localChanges = [];
Summary
In short, we built a code editor site with Svelte (and SvelteKit). Then, using quill-delta and SocketIO, we were able to handle conflict resolution.
As a takeaway from this article, here are some suggestions:
Uploading files to the project, check out GridFS
Displaying each user's cursor position
Find and Replace features
Syntax highlighting support for multiple languages, as discussed earlier
If you've read this far, I want to thank you. But if you found anything new or useful, share and stay tuned for more content.
And before you leave, here's the GitHub repository.
References
Collaborative Editing in JavaScript: An Intro to Operational Transformation (davidwalsh.name)
Building a real-time collaborative editor (mahfuz.info)
Welcome to typegoose | typegoose
Get Started with Atlas — MongoDB Atlas


