


Hello again. Today we'll create an auto karaoke system with React and Vercel.
Our project involves recognising a song from an audio sample and then displaying its lyrics to follow along. We can use ACRCloud for the audio recognition and Musixmatch to provide lyrics. Also, we will need backend code to interact with these two services. That's why we'll learn how to set up serverless functions with Vercel, to not have to create a server.
Project Setup
Let's start by initialising a Vite project with React and Typescript.
Then, we'll use the following NPM packages to get up and running:
npm i acrcloud formidable formidable-serverless jotai react-feather react-input-slider react-media-recorder

npm i -D @vercel/node @types/formidable
Song Identification
Using ACRCloud API
We need some credentials before accessing the ACRCloud API. If you haven't already, create an account at acrcloud.com and navigate to your Audio and Video Recognition Projects. On a free-tier account, you are limited to only one project. So if you already have a project, just use the credentials from there. If not, create a new project with the provided configuration.
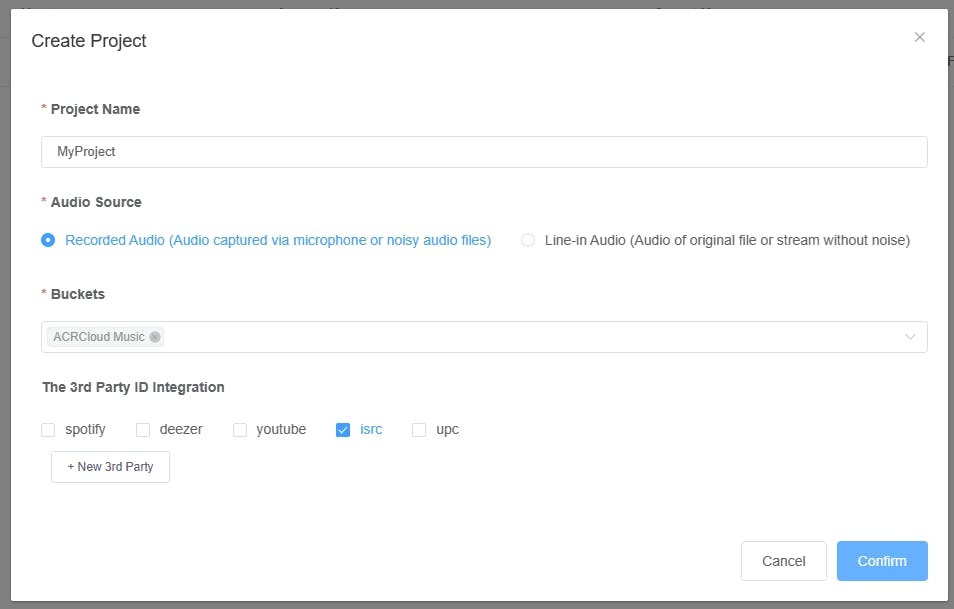
Make sure that isrc is checked after selecting the required bucket. This will be helpful later.
Copy the host, access key and secret key, then paste them into a .env file in the root of the project.
...
ACR_HOST="identify-eu-west-1.acrcloud.com"
ACR_ACCESS_KEY="INSERT_ACCESS_KEY"
ACR_SECRET="INSERT_SECRET_KEY"
Serverless Function Setup
Install the Vercel CLI using npm i -g vercel . Now run npx vercel link to link the folder with a Vercel project. You can either link an existing project or create a new one from the command line.
Once the project has been linked, create a api folder which will store separate files for each of our serverless functions. Let's create our first function to identify a song and return its ISRC.
Create a new file named acr-identify.ts in this folder, which contains our code, accessible at http://localhost:[PORT]/api/acr-identify for the front end.
import type { VercelResponse, VercelRequest } from "@vercel/node";
import { readFile } from "fs/promises";
const acrcloud = require("acrcloud");
const formidable = require("formidable-serverless");

const acr = new acrcloud({
    host: process.env.ACR_HOST as string,
    access_key: process.env.ACR_ACCESS_KEY as string,
    access_secret: process.env.ACR_SECRET as string,
    data_type: "audio",
});

const form = formidable();

// Responds with a music ISRC for an uploaded sample
export default async function (req: VercelRequest, res: VercelResponse) {
    try {
        // Promisify form.parse so that errors can be caught with only one try-catch block
        const { files } = await new Promise<{
            fields: any;
            files: { file: any };
        }>((resolve, reject) =>
            form.parse(
                req,
                async (
                    err: string | undefined,
                    fields: any,
                    files: { file: any }
                ) => {
                    if (err) {
                        reject(err);
                    }

                    resolve({ fields, files });
                }
            )
        );

        const file = files.file as any;

        // Get the file data from the uploaded file
        const fileData = await readFile(file.path);

        const data = await acr.identify(fileData);
        const metadata = data.metadata;

        if (data.status.code !== 0) {
            throw new Error(data.status.msg);
        }

        if (metadata.music?.length === 0) {
            throw new Error("No music found");
        }

        const music = metadata.music[0];

        res.status(200).json(music.external_ids.isrc);
    } catch (err) {
        res.status(500).send((err as Error).message);
    }
}
Getting Song Lyrics
Setting up Musixmatch
Similar to ACRCloud, create an account at Musixmatch Developers if you haven't already. Once you have created an application, head over to the Applications page to find the API key. Now, add the API key to your .env file.
Creating the Function
We'll use axios to request the API, first for the Musixmatch track ID for a given ISRC, then for the track's lyrics. We use the same approach as before for creating a function, but now at /api/find-lyrics. Add the following code to the new file:
import type { VercelResponse, VercelRequest } from "@vercel/node";
import axios from "axios";

const BASE_URL = "https://api.musixmatch.com/ws/1.1/";

const baseParams = {
    apikey: process.env.MUSIXMATCH_API_KEY as string,
    format: "json",
};

// Find the lyrics for a given track by its ISRC
export default async function (req: VercelRequest, res: VercelResponse) {
    try {
        const { isrc } = req.query;

        if (!isrc) {
            res.status(400).send("Song ISRC required");
            return;
        }

        let response = await axios.get(BASE_URL + "track.get", {
            params: {
                ...baseParams,
                track_isrc: isrc,
            },
        });

        const track = response.data.message.body.track;

        response = await axios.get(BASE_URL + "track.lyrics.get", {
            params: {
                ...baseParams,
                track_id: track.track_id,
            },
        });

        const lyrics = response.data.message.body.lyrics.lyrics_body;
        const title = `${track.track_name} by ${track.artist_name}`;

        res.status(200).json({ title, lyrics });
    } catch (err) {
        res.status(500).send((err as Error).message);
    }
}
The HTTP method used by serverless functions is not specified. Therefore, we'll assume the client makes a GET request, so we read the URL parameters to get the ISRC.
Atoms
We use jotai to manage the state of our React application. Create a /src/store.ts file and add the following atom configurations:
import { atom } from "jotai";

// Stores errors returned from the serverless functions
export const errorAtom = atom("");

// Stores the song title
export const titleAtom = atom("");

// Measured in words per minute
export const songRateAtom = atom(160);

// Displaying lyrics
export const lyricsAtom = atom("");
export const currentWordAtom = atom(0);

// Allows changing the index of the next word to highlight
export const newWordAtom = atom(-1);

// Write-only atom, updates the index of the highlighted word
export const nextWordAtom = atom(null, (get, set) => {
    // Get every word in the lyrics
    const words = [...get(lyricsAtom).matchAll(/[\w']+/g)].map(
        (match) => match[0]
    );
    set(currentWordAtom, (prev) => {
        // Override the new word index with any value in `newWordAtom`
        const newWord = get(newWordAtom);
        if (newWord !== -1) {
            set(newWordAtom, -1);
            return newWord;
        }

        return (prev + 1) % words.length;
    });
});
Building the App Component
If no lyrics have been returned, we display a microphone button for the user. If not, we display the lyrics and other song information. Use the following code in /src/App.tsx :
import React from "react";
import { useAtomValue } from "jotai";
import LyricsBody from "./lyrics/LyricsBody";
import MicrophoneInput from "./MicrophoneInput";
import SongTitle from "./SongTitle";
import { lyricsAtom } from "./store";
import SongRateInput from "./SongRateInput";
import ErrorMessage from "./ErrorMessage";

export default function App() {
    const lyrics = useAtomValue(lyricsAtom);

    const renderedChild =
        lyrics === "" ? (
            <MicrophoneInput />
        ) : (
            <>
                <SongTitle />
                <LyricsBody />
                <SongRateInput />
            </>
        );

    return (
        <main className="w-full h-full px-10 flex flex-col justify-center items-center">
            <h1 className="font-bold font-sans text-6xl">KaraokeNow</h1>
            <p className="mb-5">React ⚛️ + Vite ⚡ + Replit 🌀</p>
            {renderedChild}
            <ErrorMessage />
        </main>
    );
}
Note the uses of song rate within our code. Later, we'll see how to highlight the words of the lyrics so users can follow along.
Displaying Errors
Errors that occur for our auto karaoke system will often involve songs or lyrics not being found. So, we can provide this feedback to the user using a new component, /src/ErrorMessage.tsx.
import React from "react";
import { errorAtom } from "./store";
import { useAtomValue } from "jotai";

export default function ErrorMessage() {
    const error = useAtomValue(errorAtom);
    if (!error) return null;

    return (
        <div className="bg-red-500 px-6 py-4 m-7 h-24 flex overflow-auto rounded-2xl">
            <p className="font-mono my-auto w-80 whitespace-nowrap text-center">
                {error}
            </p>
        </div>
    );
}
Recording the Audio
Let's create a new MicrophoneInput the component at /src/MicrophoneInput.tsx. Here, we will use react-media-recorder to record a certain length of audio, and send the sample to our serverless function.
File Structure
Begin by defining the structure of the file.
import React, { useEffect, useState } from "react";
import { useReactMediaRecorder } from "react-media-recorder";
import { Mic, Activity } from "react-feather";
import axios, { AxiosError } from "axios";
import { useSetAtom } from "jotai";
import { errorAtom, lyricsAtom, titleAtom } from "./store";

const RECORD_DURATION = 15000;

export default function MicrophoneInput() {
    // ...
    return (
        <button type="button">
            Implement me
        </button>
    );
}
Hook Usage
Now, we need functions to update the state when we interact with the serverless functions.
// ...
const setError = useSetAtom(errorAtom);
const setLyrics = useSetAtom(lyricsAtom);
const setTitle = useSetAtom(titleAtom);
// ...
react-media-recorder provides us with hooks to simplify media recording within React. Here we add a stop event handler which submits the audio.
const { status, startRecording, stopRecording } = useReactMediaRecorder({
    audio: true,
    onStop: (_url, blob) => {
        onSubmit(blob);
    },
});
Start Recording
Recording starts when the button is clicked and stops once RECORD_DURATION milliseconds have elapsed.
const onClick = async () => {
    if (status === "recording") {
        return;
    }

    // Clear the error when recording again
    setError("");
    await startRecording();

    // Trigger the animation to start
    setEndTime(Date.now() + RECORD_DURATION);

    await new Promise((resolve) => {
        setTimeout(resolve, RECORD_DURATION);
    });

    stopRecording();
};
Animating Recording Progress
We have to use requestAnimationFrame to update the state of our progress animation. From the code above, the animation shows a bar which reduces its height during the process of recording.
useEffect(() => {
    if (endTime === 0) return;
    const request = window.requestAnimationFrame(updateProgress);

    return () => {
        window.cancelAnimationFrame(request);
    };
}, [endTime]);
And we update the progress of the animation with this function:
const updateProgress = () => {
    // elapsed time / duration
    const recorded = Math.max(0, endTime - Date.now()) / RECORD_DURATION;

    // Reset the height to full when completed
    setProgressHeight(recorded === 0 ? 100 : recorded * 100);
    window.requestAnimationFrame(updateProgress);
};
Submitting Audio Data
And now we can create a function to submit the audio file, as described before.
const onSubmit = async (blob: Blob) => {
    const body = new FormData();
    body.append("file", blob);

    try {
        let response = await axios.post("/api/acr-identify", body);

        const trackISRC = response.data;

        response = await axios.get("/api/find-lyrics", {
            params: { isrc: trackISRC },
        });
        const { title, lyrics } = response.data;

        setTitle(title);
        setLyrics(lyrics);
    } catch (err) {
        let message: string;

        if (err instanceof AxiosError) {
            message = err.response?.data;
        } else {
            message = (err as Error).message;
        }

        setError(message);
    }
};
Rendering the Animation
Let's now render a button that incorporates all the code explained above.
return (
    <button
        type="button"
        className="bg-indigo-300 rounded-2xl border-gray-300 border-2 p-7 relative"
        onClick={onClick}
        disabled={status === "recording"}
    >
        <div
            style={{
                height: `${progressHeight}%`,
            }}
            className="absolute rounded-2xl w-full bg-indigo-500 bottom-0 left-0"
        />
        <Icon className="relative z-10 w-12 h-12" />
    </button>
);
Displaying the Song Title
In /src/SongTitle.tsx, create a component to display the identified song's title.
import React from "react";
import { useAtomValue } from "jotai";
import { titleAtom } from "./store";

export default function SongTitle() {
    const title = useAtomValue(titleAtom);
    return (
        <div
            title={title}
            className="px-4 py-2 bg-gray-400/60 rounded-3xl shadow-md mb-2"
        >
            <h4 className="font-bold text-xl">{title}</h4>
        </div>
    );
}
Changing the Singing Rate
We're going to use react-input-slider to create a slider component for controlling the song rate. In reality, the lyrics won't all be sung at the same rate, but the user still has control over how fast they want to sing karaoke.
If you're interested in more accurate lyric tracking, check out Rich sync from Musixmatch.
Create the file at /src/SongRateInput.tsx and add the following code for the component:
import React from "react";
import { useAtom } from "jotai";
import { songRateAtom } from "./store";
import Slider from "react-input-slider";

export default function SongRateInput() {
    const [rate, setRate] = useAtom(songRateAtom);

    const onChange = ({ x }: { x: number }) => setRate(x);

    return (
        <div className="max-w-2xl w-full absolute bottom-8">
            <Slider
                axis="x"
                x={rate}
                xmin={100}
                xmax={250}
                onChange={onChange}
                styles={{
                    track: {
                        width: "100%",
                    },
                }}
            />
            <p className="text-center">Song Rate (WPM)</p>
        </div>
    );
}
Displaying Lyrics
To be able to follow along with the lyrics, each word will have to be highlighted individually, as shown in the demo.
Updating the Current Word
We can create a folder named lyrics inside src. The first file of three here will be LyricsBody.tsx. This component is responsible for displaying all the words of the lyrics and updating the current highlighted word.
import React, { useEffect, useMemo } from "react";
import { useAtomValue, useSetAtom } from "jotai";
import { lyricsAtom, nextWordAtom, songRateAtom } from "../store";
import parseLyrics from "./parser";

export default function LyricsBody() {
    const lyrics = useAtomValue(lyricsAtom);
    const nextWord = useSetAtom(nextWordAtom);
    const songRate = useAtomValue(songRateAtom);

    const segments = useMemo(() => parseLyrics(lyrics), [lyrics]);

    useEffect(() => {
        let request: number;

        // Converts a rate of words per minute to milliseconds per word
        const delay = (60 * 1000) / songRate;
        let start: number;
        let previousTime: number;

        const animateWords = (time: number) => {
            if (!start) {
                start = time;
                previousTime = time;
            }

            // If it's been at least `delay` milliseconds since the last word had been highlighted
            if (time - previousTime >= delay) {
                nextWord();
                previousTime = time;
            }

            request = window.requestAnimationFrame(animateWords);
        };

        request = window.requestAnimationFrame(animateWords);

        return () => {
            window.cancelAnimationFrame(request);
        };
    }, [songRate]);

    return (
        <div className="border-dashed border-4 border-slate-400 rounded-3xl p-2 w-full">
            <p className="text-3xl font-serif leading-loose h-80 overflow-y-auto text-center whitespace-pre-wrap">
                {segments}
            </p>
        </div>
    );
}
We're using requestAnimationFrame again here to make updating the highlight colour for each word a smoother process.
But note how we parse the lyrics into segments, before rendering them. This step is crucial so that each word can be styled individually.
Parsing Lyrics
Create the parser.tsx file in the lyrics folder. Remember to keep the .tsx extension, so that we can use JSX components.
This file will export the following function to chunk up the lyrics into components of individual words.
import React from "react";
import LyricWord from "./LyricWord";

export default function parseLyrics(lyrics: string) {
    // Match all words within the text, including words with apostrophes
    const matches = [...lyrics.matchAll(/[\w']+/g)];

    // Derived array to find matches by start letter index
    const matchStarts = matches.map((match) => match.index);

    const nodes = [];

    let i = 0;
    let letter: string;

    while (i < lyrics.length) {
        letter = lyrics[i];

        // Find the match index by the start letter's index
        const matchIndex = matchStarts.indexOf(i);

        if (matchIndex !== -1) {
            const match = matches[matchIndex];
            const word = match[0];

            // The match index is the word index
            nodes.push(<LyricWord key={i} index={matchIndex} word={word} />);

            // Skip to the character after the word
            i += word.length;
            continue;
        } else if (letter === "\n") {
            // Replace newlines with <br>
            nodes.push(<br key={i} />);
        } else {
            nodes.push(letter);
        }

        i++;
    }

    return nodes;
}
Displaying Each Word of Lyric
Create a new component at /src/lyrics/LyricWord.tsx . It requires the index of the word and the value of the word itself.
Then, class names are applied to the rendered <span> if the index matches the index of the current word.
import React, { useEffect, useRef } from "react";
import { useAtomValue, useSetAtom } from "jotai";
import { currentWordAtom, newWordAtom } from "../store";

interface LyricWordProps {
    index: number;
    word: string;
}

export default function LyricWord({ index, word }: LyricWordProps) {
    const elementRef = useRef<HTMLSpanElement | null>(null);
    const currentWord = useAtomValue(currentWordAtom);
    const setNewWord = useSetAtom(newWordAtom);

    useEffect(() => {
        if (index !== currentWord || elementRef.current === null) return;
        // Scroll the higlighted word into view
        elementRef.current.scrollIntoView();
    }, [currentWord]);

    // Override the value for the current word when clicked
    const onClick = () => {
        setNewWord(index);
    };

    let highlight: string;

    const distanceToCurrent = Math.abs(index - currentWord);

    if (index === currentWord) {
        highlight = "text-purple-800 font-bold border-2 p-2 rounded-xl";
    } else if (distanceToCurrent == 1) {
        highlight = "text-purple-400";
    } else {
        highlight = "text-gray-700";
    }

    return (
        <span
            ref={elementRef}
            className={`cursor-pointer translate-y-20 ${highlight}`}
            onClick={onClick}
            title="Skip here"
        >
            {word}
        </span>
    );
}
Final notes
In conclusion, we used Vercel serverless functions to identify music and find song lyrics. Then, we created a front-end interface to highlight the words one-by-one and tie everything together.
When running the project, use npx vercel dev to make sure the serverless functions are available.
Here is something else to consider:
The lyrics returned by Musixmatch weren't complete. Their free plan only includes access to 30% of lyrics per song, and full access is only available through an enterprise plan.
An alternative to Musixmatch could be genius.com, as they have an API that returns the URL to the lyrics of a song. All we would have to do is access their API and scrape the lyrics. I may publish an article explaining web scraping and this API soon.
If you liked this article and want to explore further, you can get the entire code here.
Could you add a button to reset the lyrics? Read my article explaining Jotai to find out how.
References
Getting Started | Vite (vitejs.dev)
Documentation (musixmatch.com)
react-media-recorder - npm (npmjs.com)
Install Tailwind CSS with Vite - Tailwind CSS
Average Speaking Rate and Words per Minute (virtualspeech.com)
Using requestAnimationFrame with React Hooks | CSS-Tricks - CSS-Tricks