How to Make a Chrome Extension to Create GitHub Gists With Vite, React and TailwindCSS
Hello everybody. In this article, I will improve on our previous gist command-line script.
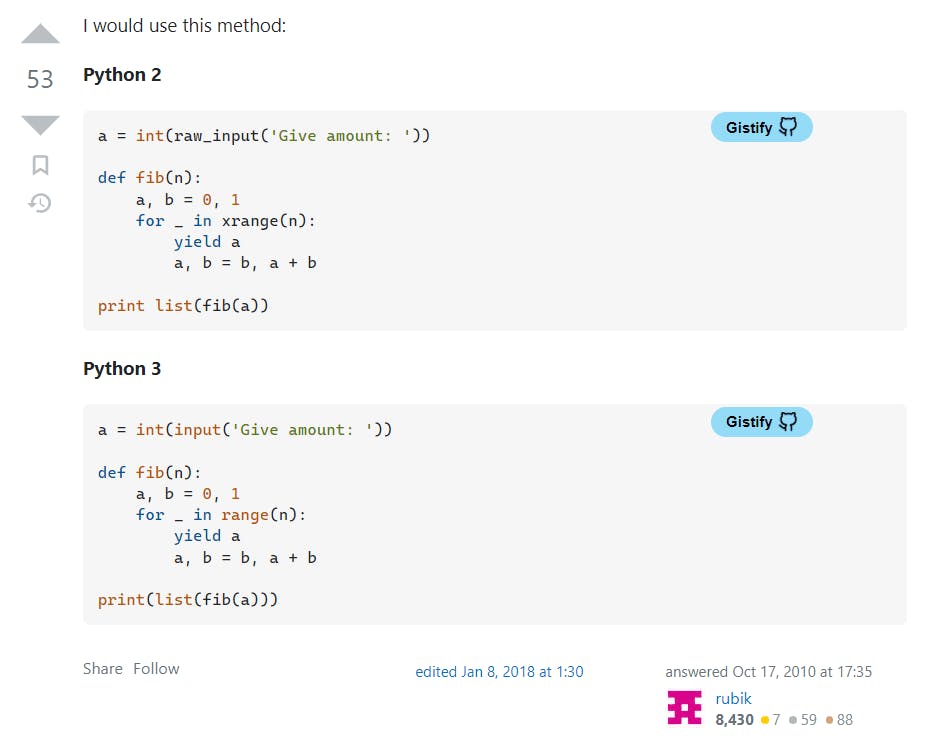
The Auto Gistify chrome extension adds a button to every code block on the page. Clicking the button will create a new gist with the file extension given by the HTML element class name.
To illustrate, suppose we have the following HTML:
<pre>
    <code class="lang-js">
        <span>var name = "CS310";</span>
        <span>console.log("Welcome to", name);</span>
    </code>
</pre
Our extension will inject the button into the document like so:
<pre>
    <button class="gistify-button">...</button>
    <code class="lang-js">
        <span>var name = "CS310";</span>
        <span>console.log("Welcome to", name);</span>
    </code>
</pre
Create Vite App
Run the following command to generate a Vite + React template in your directory:
npm create vite@latest auto-gistify -- --template react
Install TailwindCSS
Now we'll install Tailwind CSS for our project. This step isn't strictly necessary, but developing styling is rapid with TailwindCSS.
You can read the guide from their website to get started.
Manifest.json
The manifest file defines the information needed for the extension to function. Create it in the top-level directory of the project.
{
    "manifest_version": 3,
    "name": "Gistify",
    "version": "1.0.0",
    "description": "Add a button to convert code blocks into GitHub Gists",
    "action": {
        "default_popup": "index.html"
    },
    "permissions": [
        "storage",
        "activeTab",
        "clipboardWrite"
    ],
    "content_scripts": [
        {
            "matches": [
                "http://*/*",
                "https://*/*"
            ],
            "js": [
                "scripts/content_script.js"
            ],
            "css": [
                "scripts/content_script.css"
            ]
        }
    ],
    "background": {
        "service_worker": "scripts/background.js",
        "type": "module"
    },
    "web_accessible_resources": [
        {
            "resources": [
                "scripts/*.js",
                "scripts/content_main.js",
                "gists.js",
                "*.svg"
            ],
            "matches": [
                "http://*/*",
                "https://*/*"
            ]
        }
    ]
}
Note that Web Accessible Resources includes all the files we can reference.
Understanding our Project Structure
Our Auto Gistify extension consists of three parts: a popup, a content script and a service worker.
- The popup is the display the user sees when clicking the extension
- The content script injects the "Gistify" buttons
- The service worker handles the authorization
When we build our project, only the code for the popup will be in the output. So to allow the bundler to include our other files, we need to place them into the public folder.
Authorization
Before, we used the @octokit/auth-oauth-device from NPM to handle authorization. Since we can't use NPM modules in content scripts, we must add authorization ourselves.
In the public folder of the top-level directory, create a file named oauth.js. Below is the implementation for Javascript, with references from the GitHub API docs.
const BASE_URL = "https://github.com/login";

const USER_CODE_ENDPOINT = "/device/code";
const USER_AUTH_ENDPOINT = "/oauth/access_token";

const CLIENT_ID = "15ca1014289369cdbd6c";

export const getVerificationCode = async () => {
    const response = await fetch(BASE_URL + USER_CODE_ENDPOINT, {
        method: "POST",
        body: JSON.stringify({
            client_id: CLIENT_ID,
            scope: "gist",
        }),
        headers: {
            Accept: "application/json",
            "Content-Type": "application/json",
        },
    });

    const data = await response.json();
    return data;
};

export const pollAuthorization = async (deviceCode, interval) => {
    let data;

    while (!data?.access_token) {
        const response = await fetch(BASE_URL + USER_AUTH_ENDPOINT, {
            method: "POST",
            body: JSON.stringify({
                client_id: CLIENT_ID,
                device_code: deviceCode,
                grant_type: "urn:ietf:params:oauth:grant-type:device_code",
            }),
            headers: {
                Accept: "application/json",
                "Content-Type": "application/json",
            },
        });
        data = await response.json();
        await new Promise((resolve) => setTimeout(resolve, interval * 1000));
    }

    return data.access_token;
};
Service worker
When the user clicks the "Authorize" button, the popup emits an event, and the service worker handles it. First, it generates a verification code and returns it to the popup script. Next, it waits until the user has authorization and saves the access token. Create a file named background.js in the scripts folder:
import { getVerificationCode, pollAuthorization } from "../oauth.js";

chrome.runtime.onMessage.addListener(async ({ type }) => {
    switch (type) {
        case "AUTH_REQUEST":
            const verification = await getVerificationCode();

            console.log("Open %s", verification.verification_uri);
            console.log("Enter code: %s", verification.user_code);

            // Sends code to display to browser
            chrome.runtime.sendMessage({
                type: "AUTH_RESPONSE",
                payload: {
                    code: verification.user_code,
                    uri: verification.verification_uri,
                },
            });

            // Waits for user authorization
            const accessToken = await pollAuthorization(
                verification.device_code,
                verification.interval
            );

            console.log("Authorized Auto Gistify");

            chrome.storage.sync.set({
                accessToken,
            });
    }
});
Content script
We need to use dynamic imports to allow importing code in our content script. As seen in the manifest, create a scripts folder in the public folder. Then create a file named content_script.js:
(async () => {
    const src = chrome.runtime.getURL("scripts/content_main.js");
    const contentScript = await import(src);
    await contentScript.main();
})();
First, we need to retrieve the access token. Next, we must find all the code blocks and inject the buttons. Create a file named content_main.js in the same folder:
import { createGist } from "/gists.js";

// For use in multiple functions
let accessToken;

export async function main() {
    const key = "accessToken";
    accessToken = (await chrome.storage.sync.get(key))[key];
    if (!accessToken) return;

    const codeBlocks = document.querySelectorAll("pre > code");

    for (let codeBlock of codeBlocks) {
        const language = getLanguage(codeBlock);
        createGistButton(codeBlock, language);
    }
}
We need to define a function that obtains the programming language from a code block. For now, we'll take advantage of the class names set on code elements. As an alternative, you could prompt the user for the filename.
function getLanguage(codeBlock) {
    const classList = codeBlock.classList;
    for (let className of classList) {
        // .lang-{language}
        if (className.startsWith("lang-")) {
            return className.slice(5);
        }
    }
}
And now, we'll need a function that takes in our code element and the target language. It will then create a button and set an onclick handler.
Note we give the button a class name so all the buttons can be styled. We also use the object element to import our SVG GitHub icon. You can download the icon here from Feather and add it to the public folder.
function createGistButton(element, language) {
    const container = element.parentElement;
    const content = element.textContent.trim();

    container.className = "gist-container";

    const button = document.createElement("button");
    button.type = "button";
    button.className = "gist-button";

    const label = document.createElement("span");
    label.textContent = "Gistify";

    const iconURL = chrome.runtime.getURL("github.svg");
    const icon = document.createElement("object");
    icon.data = iconURL;
    icon.type = "image/svg+xml";
    icon.title = "GitHub icon";

    button.appendChild(label);
    button.appendChild(icon);

    button.onclick = async () => {
        // Create gist with target language
        const extension = language ? `.${language}` : "";
        const filename = crypto.randomUUID() + extension;
        const url = await createGist(accessToken, filename, content);
        await navigator.clipboard.writeText(url);

        // Status message shown
        label.textContent = "Gistified";
        return setTimeout(() => {
            label.textContent = "Gistify";
        }, 3000);
    };

    container.insertBefore(button, container.firstChild);
}
We do also need to implement a function that will create a gist using our access token. Create a file named gists.js in the public folder and add the following code:
const BASE_URL = "https://api.github.com/gists";

// Creates a gist from filename and content
export const createGist = async (authToken, filename, content) => {
    const response = await fetch(BASE_URL, {
        method: "POST",
        body: JSON.stringify({
            public: true,
            files: {
                [filename]: {
                    content,
                },
            },
        }),
        headers: {
            Accept: "application/vnd.github+json",
            Authorization: `Bearer ${authToken}`,
        },
    });
    const data = await response.json();
    return data.html_url;
};
Styles
Create a file named content_script.css in the same folder as content_script.js. Add the following styles:
.gist-container {
    position: relative;
}

.gist-button {
    border-radius: 15px;
    background: #93dbf7;
    padding: 4px 12px;
    position: absolute;
    top: 2px;
    right: 75px;
    border: 0px;
    display: flex;
    flex-direction: row;
    justify-content: center;
    align-items: center;
}

.gist-button:hover {
    cursor: pointer;
    background: #97d3dd;
}

.gist-button > span {
    color: black;
    font-size: 12px;
    font-weight: bold;
}

.gist-button > object {
    display: inline;
    margin: 0 0 0 4px;
    width: 16px;
    height: 16px;
}

.gist-button > object:hover {
    cursor: pointer;
}
Extension popup (React)
We create a single React component to display our popup. It stores authData, which holds the verification code and URL to display. There is also authorized to handle the authorization state.
import { useEffect, useState } from "react";
import { GitHub, ExternalLink } from "react-feather";

function App() {
    const [authData, setAuthData] = useState();
    const [authorized, setAuthorized] = useState(false);
    return ...
}

export default App;
We can now add lifecycle effects to retrieve the access token from storage.
// Initially check for authorised state
useEffect(() => {
    (async () => {
        const key = "accessToken";
        const accessToken = (await chrome.storage.sync.get(key))[key];
        if (accessToken) {
            setAuthorized(true);
        }
    })();
}, []);

// Checks whether an access token has just been set
useEffect(() => {
    const onStorageChanged = (changes) => {
        if (changes.accessToken) {
            const accessToken = changes.accessToken.newValue;
            setAuthorized(Boolean(accessToken));
        }
    };

    chrome.storage.sync.onChanged.addListener(onStorageChanged);

    return () => {
        chrome.storage.sync.onChanged.removeListener(onStorageChanged);
    };
}, []);
Also, we can set up a listener for the AUTH_RESPONSE event the service worker emits. We'll then update our state variable.
useEffect(() => {
    const onMessage = ({ type, payload }) => {
        switch (type) {
            case "AUTH_RESPONSE":
                // Containing auth code and uri to display
                setAuthData(payload);
                break;
        }
    };

    chrome.runtime.onMessage.addListener(onMessage);

    return () => {
        chrome.runtime.onMessage.removeListener(onMessage);
    };
}, []);
And here is all the markup for our component, styled with Tailwind classes.
return (
    <div className="App p-5 min-w-[300px] min-h-[200px] flex flex-col justify-center items-center">
        <h1 className="font-bold text-5xl text-center">Auto Gistify</h1>
        <button
            type="button"
            className="rounded-lg py-3 px-5 mt-3 bg-gray-900 hover:text-gray-500 transition-colors cursor-pointer font-medium hover:border-blue-500 focus:ring"
            onClick={onLogin}
        >
            {authorized ? "Authorised" : "Authorise GitHub"}
            <GitHub className="h-6 inline ml-3" />
        </button>
        {authData && (
            <div className="flex flex-row mt-2 items-center">
                <button
                    type="button"
                    title="Copy to clipboard"
                    className="px-3 py-1 rounded-lg bg-gray-600 border-gray-200"
                    onClick={() =>
                        navigator.clipboard.writeText(authData.code)
                    }
                >
                    <span className="w-6 h-4">Code: {authData.code}</span>
                </button>
                <a
                    target="_blank"
                    rel="noopener noreferrer"
                    href={authData.uri}
                    title="Open verification URL"
                    className="ml-2 p-1 h-fit rounded-full bg-gray-700 border-blue-400"
                >
                    <ExternalLink className="h-3 w-3 m-2" />
                </a>
            </div>
        )}
    </div>
);
The .env file
In the top-level directory, add this line to a new .env file to avoid problems with Chrome:
INLINE_RUNTIME_CHUNK=false
And now we can build the extension.
Build the extension
Run npm run build to place the build output in the dist folder.
Go to chrome://extensions in a Chromium-based browser's new tab. Enable Developer Mode, click "Load unpacked", then select the dist folder.
Testing it out
Open up any page with code blocks and you should see the injected buttons. Click on one, and the link to a new gist should be copied to the clipboard.

Conclusion
And that's all! You can find the whole project here on GitHub. Thanks to Vladimir Topolev for suggesting this idea.
References
docs.github.com/en/developers/apps/building..
stackoverflow.com/questions/48104433/how-to..

