


How to Build a Practical Pomodoro Timer with Tauri
Follow a comprehensive guide to develop your own Pomodoro timer using Rust


Table of contents
- Introduction
- What Is Pomodoro? How Does It Work?
- Why Tauri?
- The Architecture
- Prerequisites
- Setting Up the Development Environment
- Creating the Project
- Rust Dependencies
- Deep Dive into Rust
- Time Phases
- Switching Phase
- Getting the New Phase
- Resetting the Phase
- Setting a New Phase
- Session Number
- Getting Remaining Time
- Handling Notifications
- Restoring State
- Tracking Progress with Stats
- Adding Settings and Customization
- Stores
- Designing the User Interface
- Installing JS Packages
- Layout Design
- The Timer Page
- The Report Page
- The Settings Page
- Stores on the Frontend
- Displaying the Phase Title
- Buttons to Switch Phase
- Displaying the Timer
- The Action Button
- Hooking the Report Page with Stats Data
- Stats and stat? Stat and stats? Stat(s)
- Setting the Application Window Title
- Hooking the stores with the Settings Page
- Playing a Tune when the Phase Switches
- Building the Desktop App
- Testing and Debugging
- Packaging and Distribution
- Conclusion
- Additional Resources
- Author's Note
Introduction
In this guide, I'll walk you through the process of creating your own Pomodoro desktop app using Rust and Tauri.
What Is Pomodoro? How Does It Work?
To start, let's briefly explain what the Pomodoro technique entails. It's a method for tightly managing your work and break intervals. Typically, you work for 25 minutes, followed by a 5-minute break. Many people find Pomodoro helpful for maintaining focus and productivity.
Why Tauri?
Tauri dethrones Electron in the world of cross-platform application development. Apps built with Tauri are more lightweight and resource-efficient.
Moreover, Tauri harnesses the power of Rust, a programming language admired by developers worldwide.
The Architecture
There are three phases in this system: Work, Short Break, and Long Break. Initially, you start in the Work phase. After a designated period (typically 25 minutes) your phase switches to Short Break. On every fourth switch, the Long Break phase becomes active.
We use Tauri commands to communicate between the backend and front end of the application.
After each work phase the user goes through, their stats increase. This includes an increase in the number of work sessions, and the total number of minutes spent working.
Also, a notification is triggered when the phase switches. This serves as a reminder to either take a break or get back to work.
But what if your focus doesn't align with a fixed 25-minute timeframe, or you prefer longer work sessions? Well, the app allows you to customize your work and break durations through settings.
Prerequisites
Setting Up the Development Environment
Start by making sure to follow the Tauri prerequisites.
Creating the Project
The stack is simple: Rust with Tauri on the backend, and SvelteKit + DaisyUI on the frontend.
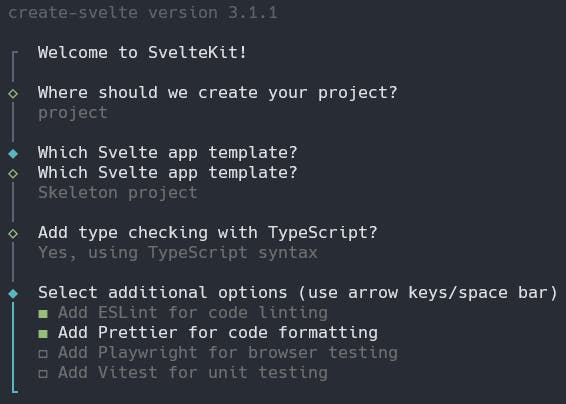
To get started, let’s scaffold a new Tauri project:
npm create tauri-app@latest
Make sure to select Svelte + TypeScript:
Now that the project directory has been created, follow the instructions on-screen.
Rust Dependencies
Run the following command to add all the necessary dependencies:
cargo add serde serde_json -F serde/derive chrono tauri-plugin-store anyhow thiserror
Breakdown
serde → Serialisation library
serde_json → Handles JSON serialisation/deserialisation
chrono → Provides useful data structures for working with time
tauri-plugin-store → Provides a key-value store to store data on the computer’s filesystem
anyhow + thiserror → These combine to provide a universal error type to use across the codebase
Deep Dive into Rust
All of our Rust code will live in the main.rs file in the src-tauri/src folder. Open it and you should see the following code:
#![cfg_attr(not(debug_assertions), windows_subsystem = "windows")]

fn main() {
tauri::Builder::default()
   .run(tauri::generate_context!())
   .expect("error while running tauri application");
}
Begin by including the following imports at the top of the file:
use chrono::{DateTime, Datelike, Utc};
use serde::{de::DeserializeOwned, Deserialize, Serialize};
use serde_json::{from_value, json};
use std::{path::PathBuf, sync::Mutex};
use tauri::{api::notification::Notification, AppHandle, Manager, Wry};
use tauri_plugin_store::{Builder, Store, StoreBuilder, StoreCollection};
Time Phases

We’ll use an Enum type to represent the phases. By default, the value is “Work”.
#[derive(PartialEq, Serialize, Clone, Copy, Debug)]
enum TimePhase {
    Work,
    ShortBreak,
    LongBreak,
}

impl Default for TimePhase {
    fn default() -> Self {
        Self::Work
    }
}
Note that we use Tauri’s managed state to store our TimePhase instance. But given that it will change throughout the life of the application, it will need to be wrapped in a mutex.
struct Phase(Mutex<TimePhase>);
Now, we can go back to the main function to manage this state:
fn main() {
    tauri::Builder::default()
        .run(tauri::generate_context!())
        .expect("error while running tauri application")
        .manage(Phase(Mutex::new(TimePhase::default())));
}
Switching Phase
Once the phase is over, the frontend will send a command to the backend to switch the phase. As mentioned before, this will also update stats, emit a notification, and update the time remaining on the clock.
Let’s create a command named switch_phase:
#[tauri::command]
fn switch_phase(
    is_previous: bool,
    is_user: bool,
    app: AppHandle,
    session_number_state: tauri::State<SessionNumber>,
    phase_state: tauri::State<Phase>,
) {
    // ...
}
Here, is_previous signifies whether the new stage is the next phase, or if the user had clicked to go backwards.
is_user states whether the user made the phase change through a button click. This would mean that the configured amount of time did not pass.
app is how Tauri commands have access to everything about Tauri and its stores in particular.
session_number_state is a piece of managed state that will store the number of phases the user has been through. It is how the application will know whether to initiate a long break or a short break.
phase_state stores the current phase, for use across the application.
Complete the function with the following code:
let session_number = *session_number_state.0.lock().unwrap();
let phase = phase_state.0.lock().unwrap().clone();

with_store(&app, |store| {
    if TimePhase::Work == phase && !(is_user || is_previous) {
        update_stats(&app, store);
    }

    let session_number = update_session_number(&app, session_number, is_previous);

    let new_phase = get_new_phase(&app, store, session_number).unwrap();
    set_phase(&app, new_phase);

    emit_status_notification(&app);

    let remaining = get_remaining(&app, store).unwrap();
    app.emit_all("remaining", remaining);
    Ok(())
});
For context, the with_store function needs the AppHandle to access the key-value store.
app.emit_all emits the time remaining in this new phase to the front end.
Getting the New Phase
Now we can define get_new_phase. It takes in the current session number and outputs the corresponding TimePhase value.
Note that the session number is 0-indexed, whilst the long_break_interval defines that a LongBreak is inserted every n breaks.
fn get_new_phase(
    app: &AppHandle,
    store: &mut Store<Wry>,
    session_number: i32,
) -> Result<TimePhase, Error> {
    let settings: Settings = get_from_store(store, "settings")?;

    let phase = app.state::<Phase>();
    let long_break_interval = settings.long_break_interval;

    let new_phase = if session_number % 2 == 1 {
        if (session_number % (long_break_interval * 2 - 1)) == 0 {
            Ok(TimePhase::LongBreak)
        } else {
            Ok(TimePhase::ShortBreak)
        }
    } else {
        Ok(TimePhase::Work)
    };
    new_phase
}
Resetting the Phase
The front end handles the app’s countdown logic. So, all we need to reset the phase is to re-emit the time configured for that phase.
#[tauri::command]
fn reset_phase(app: AppHandle) {
    with_store(&app, |store| {
        let remaining = get_remaining(&app, store).unwrap();
        app.emit_all("remaining", remaining);
        Ok(())
    });
}
Setting a New Phase
We need a function that will update the phase in the application’s state. Then, this change can be signalled to the front end.
fn set_phase(app: &AppHandle, new_phase: TimePhase) {
    let phase = app.state::<Phase>();
    *phase.0.lock().unwrap() = new_phase;
    app.emit_all("switch-phase", phase.0.lock().unwrap().clone());
}
Session Number

We use a session number to keep track of how many phases the user has been through. This is so that a long break can be initiated where needed.
struct SessionNumber(Mutex<i32>);
But don’t forget to manage the state, in our main function:
fn main() {
    tauri::Builder::default()
        .run(tauri::generate_context!())
        .expect("error while running tauri application")
        .manage(Phase(Mutex::new(TimePhase::default())))
        .manage(SessionNumber(Mutex::new(0)));
}
Updating Session Number
As the phase switches, the session number will need to either increment or decrement. We then emit the new value to the front end.
fn update_session_number(app: &AppHandle, previous_value: i32, is_previous: bool) -> i32 {
    let session_number = app.state::<SessionNumber>();

    let new_value = if !is_previous {
        previous_value + 1
    } else {
        previous_value - 1
    };

    *session_number.0.lock().unwrap() = new_value;

    app.emit_all("session-number", new_value);
    new_value
}
Getting Remaining Time
Here we return the configured number of minutes for the current phase.
fn get_remaining(app: &AppHandle, store: &mut Store<Wry>) -> Result<i32, Error> {
    let settings: Settings = get_from_store(store, "settings")?;

    let phase = app.state::<Phase>();
    let value = match phase.0.lock().unwrap().clone() {
        TimePhase::Work => settings.work_time,
        TimePhase::ShortBreak => settings.short_break_time,
        TimePhase::LongBreak => settings.long_break_time,
    };

    Ok(value)
}
Handling Notifications

We use Tauri’s Notifications API to alert the user about the new phase they have entered with a custom message.
fn emit_status_notification(app: &AppHandle) {
    let phase = app.state::<Phase>();
    let body = match phase.0.lock().unwrap().clone() {
        TimePhase::Work => "Time to get back to work!",
        TimePhase::ShortBreak => "Have a little rest!",
        TimePhase::LongBreak => "Take some extra time to relax!",
    };

    Notification::new(app.config().tauri.bundle.identifier.clone())
        .title("Phase changed")
        .body(body)
        .show()
        .unwrap();
}
Restoring State
We can also create a command to re-emit each state value. This is important for restoring the state on startup.
#[tauri::command]
fn restore_state(
    app: AppHandle,
    phase: tauri::State<Phase>,
    session_number: tauri::State<SessionNumber>,
) {
    app.emit_all("switch-phase", phase.0.lock().unwrap().clone());
    app.emit_all("session-number", *session_number.0.lock().unwrap());
    with_store(&app, |store| {
        let remaining = get_remaining(&app, store).unwrap();
        app.emit_all("remaining", remaining);
        Ok(())
    });
}
Tracking Progress with Stats

We track the number of minutes and work sessions the user completes. This applies to today, this week, and all time.
#[derive(Default, Serialize, Deserialize, Debug)]
struct Stat {
    minutes: i32,
    sessions: i32,
}

#[derive(Serialize, Deserialize, Debug)]
struct Stats {
    today: Stat,
    week: Stat,
    total: Stat,
}

impl Default for Stats {
    fn default() -> Self {
        Self {
            today: Stat::default(),
            week: Stat::default(),
            total: Stat::default(),
        }
    }
}
Updating Stats
Let’s create a function named update_stats. It uses the number of minutes in the current phase to see how long the user has worked for.
Then we add that number of minutes to each field in the Stats struct, as well as incrementing the number of sessions by 1.
But note that this function is only called when the user doesn’t manually skip the phase.
fn update_stats(app: &AppHandle, store: &mut Store<Wry>) -> Result<(), Error> {
    let elapsed_time = get_remaining(&app, store)?;
    let mut stats: serde_json::Value = get_from_store(store, "stats")?;

    for key in ["today", "week", "total"].iter() {
        let minutes: i32 = from_value(stats[key]["minutes"].clone())?;
        stats[key]["minutes"] = json!(minutes + elapsed_time);

        let sessions: i32 = from_value(stats[key]["sessions"].clone())?;
        stats[key]["sessions"] = json!(sessions + 1);
    }

    store.insert("stats".into(), json!(stats));
    Ok(())
}
Resetting Stats
As there is a today and week field, we need to reset these numbers at the start of each new day/week. A simple solution would be to check if at least 1 day/week has passed since the user last opened the application.
To do this, the function reset_stats checks if the current day is the same as the day the app was last opened. If so, we reset the today field to 0. Likewise, if the current week is not the same as the week as the week the user last opened the app, we reset the week field.
// Check if the stats for yesterday or last week need resetting
fn check_stat_reset(store: &mut Store<Wry>) -> Result<bool, Error> {
    let last_opened: DateTime<Utc> = get_from_store(store, "last_opened")?;
    let mut stats: Stats = get_from_store(store, "stats");

    let today = Utc::now();

    // If last opened is on a different year,
    // or on a different day of the year
    if today.year() != last_opened.year() || today.ordinal() != last_opened.ordinal() {
        // Reset "today" on stats
        stats.today = Stat::default();
        store.insert("stats".into(), json!(stats));
        return Ok(true);
    }
    if today.year() != last_opened.year()
        || today.iso_week().week() != last_opened.iso_week().week()
    {
        // Reset "week" on stats
        stats.week = Stat::default();
        store.insert("stats".into(), json!(stats));
        return Ok(true);
    }
    return Ok(false);
}
Adding Settings and Customization

Start by creating a struct that follows the conventional Pomodoro settings.
#[derive(Serialize, Deserialize, Debug)]
struct Settings {
    work_time: i32,
    short_break_time: i32,
    long_break_time: i32,
    long_break_interval: i32,
}

impl Default for Settings {
    fn default() -> Self {
        Self {
            work_time: 25,
            short_break_time: 5,
            long_break_time: 20,
            long_break_interval: 4,
        }
    }
}
Updating Settings
When the user changes their settings, the front end will trigger a command with these changes.
#[tauri::command]
fn update_settings(settings: Settings, app: AppHandle) {
    with_store(&app, |store| {
        store.insert("settings".into(), json!(settings));
        Ok(())
    });
}
Stores

Now, let's construct a persistent key-value store within the main function. By default, it will include the keys we've talked about earlier. Add the following code to begin:
fn main() {
    tauri::Builder::default()
        .setup(|app| {
            let store = StoreBuilder::new(app.handle(), STORE_PATH.into())
                .default("settings".into(), json!(Settings::default()))
                .default("stats".into(), json!(Stats::default()))
                .default("last_opened".into(), json!(Utc::now()))
                .build();
            app.handle().plugin(Builder::default().store(store).build());
        })
        .manage(Phase(Mutex::new(TimePhase::default())))
        .manage(SessionNumber(Mutex::new(0)));
                .run(tauri::generate_context!())
        .expect("error while running tauri application");
}
However, keep in mind that we also need to call check_stat_reset with our store. Unfortunately, to register the store plugin we must pass it by value. So we must re-create the store:
fn main() {
    tauri::Builder::default()
        .setup(|app| {
            let store = StoreBuilder::new(app.handle(), STORE_PATH.into())
                .default("settings".into(), json!(Settings::default()))
                .default("stats".into(), json!(Stats::default()))
                .default("last_opened".into(), json!(Utc::now()))
                .build();
            app.handle().plugin(Builder::default().store(store).build());

            let mut store = StoreBuilder::new(app.handle(), STORE_PATH.into())
                .default("settings".into(), json!(Settings::default()))
                .default("stats".into(), json!(Stats::default()))
                .default("last_opened".into(), json!(Utc::now()))
                .build();

            check_stat_reset(&mut store);
            Ok(())
        })
        .manage(Phase(Mutex::new(TimePhase::default())))
        .manage(SessionNumber(Mutex::new(0)))
                .run(tauri::generate_context!())
        .expect("error while running tauri application");
}
Accessing The Store
We can now define the with_store function, which provides access to the store within a closure:
fn with_store<F>(app: &AppHandle, f: F)
where
    F: FnOnce(&mut Store<Wry>) -> Result<(), tauri_plugin_store::Error>,
{
    let stores = app.state::<StoreCollection<Wry>>();
    tauri_plugin_store::with_store(app.clone(), stores, PathBuf::from(STORE_PATH), f);
}
Then the get_from_store function deserializes a value from the application’s store into a generic type:
fn get_from_store<'a, T: DeserializeOwned>(store: &mut Store<Wry>, key: &str) -> Result<T, Error> {
    Ok(from_value(
        (*store.get(key.clone()).expect("Field doesn't exist!")).clone(),
    )?)
}
Registering All Commands
Add the following code near the end of the function chain in the main function:
fn main() {
  tauri::Builder::default()
        // ...
    .invoke_handler(tauri::generate_handler![
        switch_phase,
        reset_phase,
        update_settings,
        restore_state
        ])
    .run(tauri::generate_context!())
    .expect("failed to run app");
}
Designing the User Interface
Installing JS Packages
First, we will need to install the JavaScript bindings for the key-value store plugin:
npm i @tauri-apps/plugin-store
Then, let’s install Tailwind CSS, adding daisyUI as a plugin.
Note that on the front end, located in the src folder, the main sub-folders we will use are lib and routes. lib will store all of our shared UI components, whereas the components in routes bring everything together.
Layout Design
Open up the routes/+layout.svelte file and add the following code:
<script>
    import '../app.css';
</script>

<div class="bg-base-100 flex min-h-screen flex-col">
    <div class="navbar bg-neutral text-neutral-content px-6 py-10 justify-between">
        <h1 class="text-3xl font-bold">Tauri Pomodor</h1>
        <div class="flex flex-row space-x-4">
            <a role="button" href="/" class="btn btn-active">Timer</a>
            <a role="button" href="/report" class="btn btn-active">Report</a>
            <a role="button" href="/settings" class="btn btn-active">Settings</a>
        </div>
    </div>
    <div class="flex flex-col p-8 flex-1 justify-center items-center"><slot /></div>
</div>
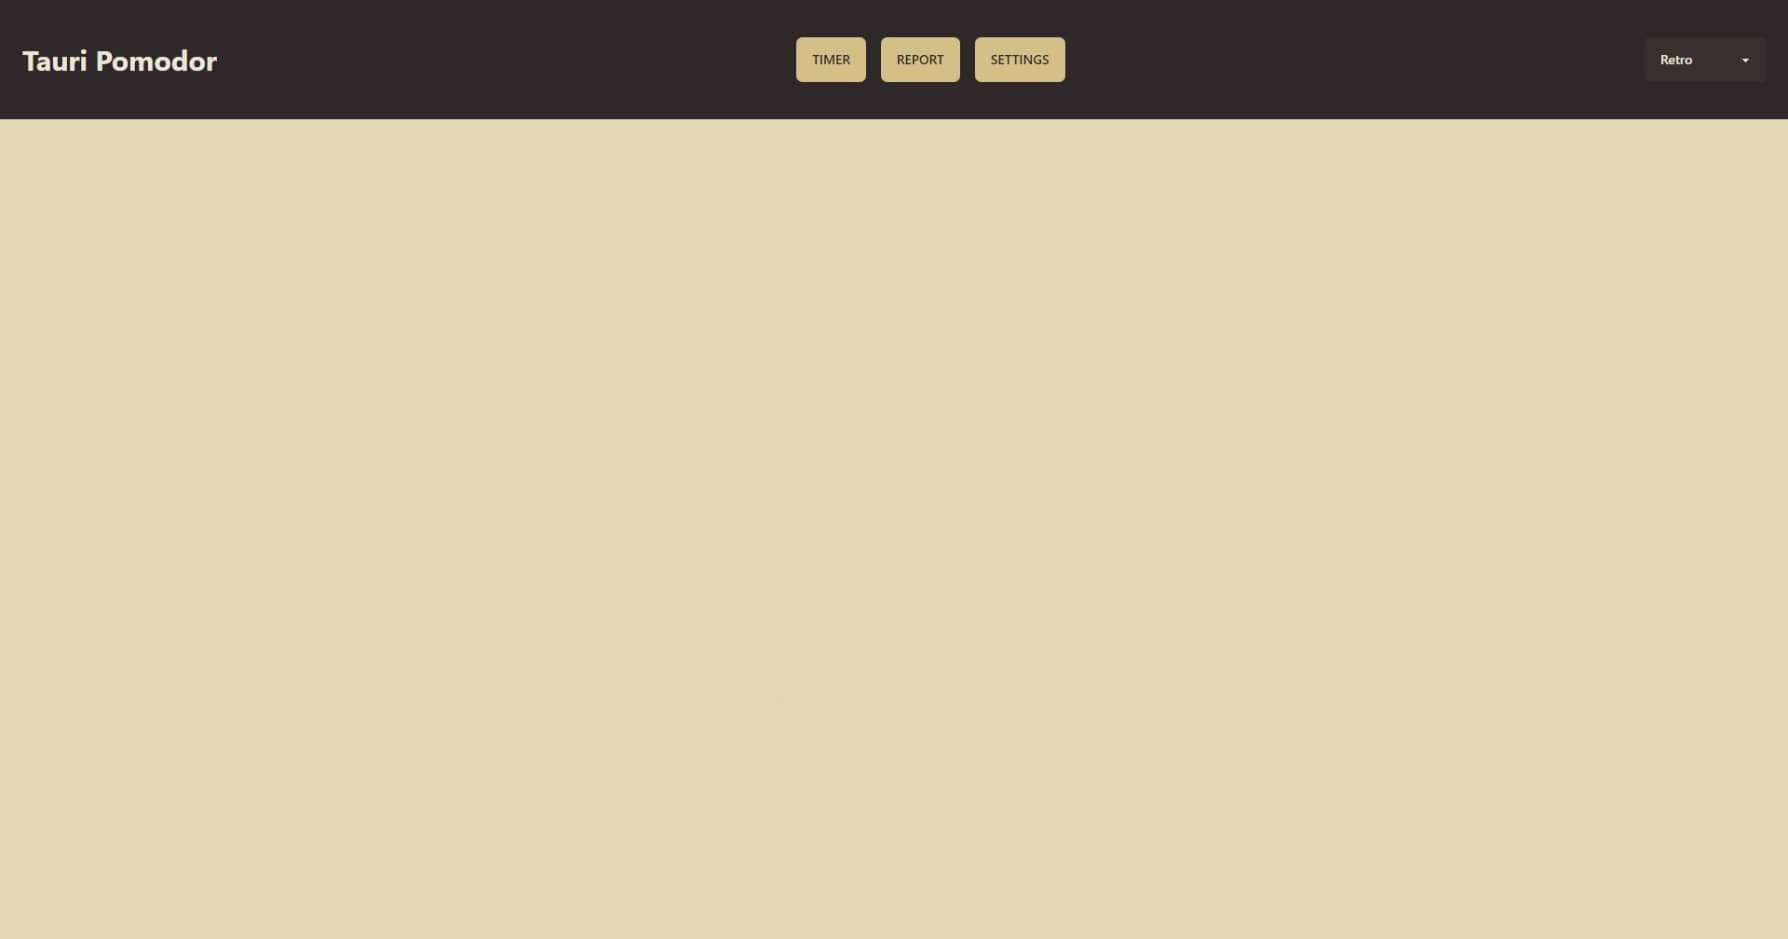
Now, when you run the application with npm run tauri dev, you should see the following display (note: I also added a colour theme switcher for convenience).
The Timer Page

Add the following code to the file in routes/+page.svelte:
<script>
    import TimeDisplay from '$lib/TimeDisplay.svelte';
    import ActionButton from '$lib/ActionButton.svelte';
    import PhaseSwitcher from '$lib/PhaseSwitcher.svelte';
    import PhaseTitle from '$lib/PhaseTitle.svelte';
</script>

<PhaseTitle />

<PhaseSwitcher>
        <TimeDisplay />
</PhaseSwitcher>

<ActionButton />
The Report Page

As you can see, there are buttons for each time scale (today, this week, all time). The numbers below correspond to the stats for that certain time scale.
Start by opening routes/report/+page.svelte, and add the following code:
<script lang="ts">
  let stats = {
      today: {
          minutes: 0,
          sessions: 0
      },
      week: {
          minutes: 0,
          sessions: 0
      },
      total: {
          minutes: 0,
          sessions: 0
      }
  };

  const timeScaleOptions = ['today', 'week', 'total'];

  let timeScale = 'today';
</script>
For now, the stats variable is set to default, but we will later hook this up with the application store to get the real values.
Displaying Stats
First, include the following imports at the top of the file:
import Stat from '$lib/Stat.svelte';
import Stats from '$lib/Stats.svelte';
import clock from '$lib/assets/clock.svg?raw';
import hash from '$lib/assets/hash.svg?raw';
Note that the SVG icons have been downloaded from Feather.
We can use the Stats and Stat components (which we’ll create later) to display the data:
<Stats class="mt-6 text-primary">
  <Stat title="Minutes" value="{stats[timeScale].minutes}"
    ><div class="text-primary contents" slot="figure">{@html clock}</div></Stat
  >
  <Stat title="Sessions" value="{stats[timeScale].sessions}"
    ><div class="text-primary contents" slot="figure">{@html hash}</div></Stat
  >
</Stats>
Changing TimeScale
For this, we can make use of radio input buttons.
<div class="join" on:change={(e) => (timeScale = e.target?.value)}>
    {#each timeScaleOptions as timeScaleOption}
        <input
            class="join-item btn"
            type="radio"
            name="options"
            id={getIdForOption(timeScaleOption)}
            value={timeScaleOption}
            aria-label={timeScaleOption[0].toLowerCase() + timeScaleOption.slice(1)}
        />
    {/each}
</div>
And the getIdForOption has the following definition:
const getIdForOption = (name: string) => `${name}-input`;
Now, when you run the code you will find that the default option (which we had set to “today”) doesn’t look selected. Let’s change that by clicking on its radio button when the component mounts:
onMount(() => {
    (document.getElementById(getIdForOption('today')) as HTMLInputElement)?.click();
});
The Settings Page

Here you can see that we also use the Stat and Stats components. But here, they must function as input components. Add the following code to settings/+page.route:
<script lang="ts">
    import Stats from '$lib/Stats.svelte';
    import Stat from '$lib/Stat.svelte';
    import { invoke } from '@tauri-apps/api/tauri';

    let workTime = 25;
    let shortBreakTime = 5;
    let longBreakTime = 20;
    let longBreakInterval = 4;

    const onSave = async () => {
        await invoke('update_settings', {
            settings: {
                work_time: workTime,
                short_break_time: shortBreakTime,
                long_break_time: longBreakTime,
                long_break_interval: longBreakInterval
            }
        });
    };
</script>

<Stats class="max-w-lg">
    <Stat title="Work" bind:value={workTime} input />
    <Stat title="Short break" bind:value={shortBreakTime} input />
    <Stat title="Long break" bind:value={longBreakTime} input />
</Stats>

<Stats class="w-48 mt-8">
    <Stat title="Long break interval" bind:value={longBreakInterval} input />
</Stats>

<div class="flex flex-row justify-end w-full mt-6">
    <button class="btn btn-primary" on:click={onSave}>Save</button>
</div>
Stores on the Frontend
Now that we have set out a basic skeleton for the frontend design, we can start to hook up the display with the user’s data.
Create a new file named stores.ts in the lib folder, and add the following imports:
import { derived, readable, writable } from 'svelte/store';
import { listen } from '@tauri-apps/api/event';
import { Store } from '@tauri-apps/plugin-store';
import { invoke } from '@tauri-apps/api';
Exposing the Key-Value Store
export const appStore = new Store('.store.dat');
Time Phases Enum
export enum TimePhase {
    WORK = 'Work',
    SHORT_BREAK = 'ShortBreak',
    LONG_BREAK = 'LongBreak'
}
Current application state
Given that I had mentioned that the timing logic will be placed on the front end, we will have to manage the current timer state.
export const paused = writable(true);
export const hasStarted = writable(false);
hasStarted defines whether the user has at least once started the timer. This is important because it will help decide whether to display “Resume” or “Start” when the app is paused. That is to say, when the user has just loaded the application, “Start” will display.
Updating the Current Phase
Remember all those events we emitted from the backend? Well, now we can use them to update the front end’s state.
We can use a readable Svelte store to remain synchronised with the “switch-phase” event payload:
export const phase = readable<TimePhase>(TimePhase.WORK, (set) => {
    let unlisten: () => void;

    listen('switch-phase', (event) => {
        set(event.payload as TimePhase);
    }).then((fn) => (unlisten = fn));

    return () => {
        unlisten?.();
    };
});
Updating the Session Number
The same principle applies here: listen and set. Note that we add 1 to the value since it is originally 0-indexed.
export const sessionNumber = readable(1, (set) => {
    let unlisten: () => void;

    listen('session-number', (event) => {
        set((event.payload as number) + 1);
    }).then((fn) => (unlisten = fn));

    return () => {
        unlisten?.();
    };
});
Counting Down Remaining Time
The remaining time is somewhat similar but also different. Like before, it comes from a backend signal. However, we'll decrease the remaining time by 1 each second as long as the app is not paused. When this value reaches zero, a signal triggers the phase switch.
export const remaining = derived(
    paused,
    ($paused, set, update) => {
        let unlisten: () => void;
        listen('remaining', (event) => {
            set((event.payload as number) * 60);
        }).then((fn) => (unlisten = fn));

        const interval = setInterval(() => {
            if ($paused) return;
            update((previous) => {
                const newValue = Math.max(previous - 1, 0);
                if (newValue === 0) {
                    invoke('switch_phase', { isPrevious: false, isUser: false });
                }

                return newValue;
            });
        }, 1000);

        return () => {
            unlisten?.();
            clearInterval(interval);
        };
    },
    25 * 60
);
Note that remaining is in seconds, whilst the value that comes from the “remaining” event is in minutes.
Displaying the Phase Title

Here we will use the phase store and the sessionNumber store, displaying their values. Place the following code in $lib/PhaseTitle.svelte:
<script lang="ts">
    import { TimePhase, phase, sessionNumber } from './stores';

    const phaseNames = {
        [TimePhase.WORK]: 'Work',
        [TimePhase.SHORT_BREAK]: 'Short break',
        [TimePhase.LONG_BREAK]: 'Long break'
    };
    $: title = phaseNames[$phase];
</script>

<h1 class="text-3xl font-bold mb-2">{title}</h1>
<h3 class="text-xs font-semibold mb-8">Session {$sessionNumber}</h3>
Buttons to Switch Phase
Create a new file named $lib/PhaseSwitcher.svelte. Here we will include 2 buttons to switch the phase backwards or forwards. This component will include a <slot> so that we can include other components as children:
<script lang="ts">
    import { invoke } from '@tauri-apps/api/tauri';
    import arrowLeft from '$lib/assets/arrow-left-circle.svg';
    import arrowRight from '$lib/assets/arrow-right-circle.svg';
    import { sessionNumber } from '$lib/stores';

    const switchPhase = (isPrevious: boolean) => {
        invoke('switch_phase', { isPrevious, isUser: true });
    };

    const btnClassName = 'btn btn-lg btn-circle btn-ghost';
</script>

<div class="flex flex-row w-full justify-center items-center">
    <div class="mr-4 w-16 h-16">
        {#if $sessionNumber > 1}
            <button class={btnClassName} on:click={() => switchPhase(true)}
                ><img src={arrowLeft} alt="left" class="w-full h-full" /></button
            >
        {/if}
    </div>
    <slot />
    <button class={`${btnClassName} ml-4`} on:click={() => switchPhase(false)}
        ><img src={arrowRight} alt="right" class="w-full h-full" /></button
    >
</div>
Displaying the Timer
Insert the following code into $lib/TimeDisplay.svelte:
<script lang="ts">
import { remaining, phase, appStore } from '$lib/stores';
const phaseTimeMapping = {
Work: 'work_time',
ShortBreak: 'short_break_time',
LongBreak: 'long_break_time'
};
let total = 0;
$: appStore.get('settings').then((value) => (
total = value[phaseTimeMapping[$phase]] * 60
));
$: value = [Math.floor($remaining / 60), $remaining % 60];
$: progress = ($remaining / total) * 100;
</script>
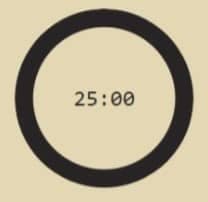
<div class="radial-progress" style="--size: 12rem; --value: {progress}">
<span class="countdown font-mono text-2xl">
<span style="--value: {value[0]}" />:
<span style="--value: {value[1]}" />
</span>
</div>
total stores the total amount of time the user has for a certain phase, as configured by their settings.
value takes the remaining time, and splits it into an array of [minutes, seconds].
progress is the remaining time as a percentage of the total time.
Thanks to daisyUI, we can set up that neat little radial progress bar to count down the time.
The Action Button

Create a new file $lib/ActionButton.svelte. This component will render a button to start/stop the timer.
It will also conditionally render a reset button that will invoke the “reset_phase” command.
<script lang="ts">
    import { paused, hasStarted } from '$lib/stores';
    import { invoke } from '@tauri-apps/api/tauri';

    const onClick = () => {
        $paused = !$paused;
        if (!$hasStarted) $hasStarted = true;
    };

    const onReset = async () => {
        await invoke('reset_phase');
    };

    $: canReset = $paused && $hasStarted;

    $: btnClassName = 'mt-10 btn btn-primary ' + (canReset ? 'w-32' : 'w-64');
</script>

<div class="flex flex-row w-full justify-center items-center space-x-6">
    {#if canReset}
        <button class={btnClassName} on:click={onReset}>Reset</button>
    {/if}
    <button class={btnClassName} on:click={onClick}>
        {#if $paused}{$hasStarted ? 'Resume' : 'Start'}{:else}Pause{/if}
    </button>
</div>
Hooking the Report Page with Stats Data
Open up the routes/report/+page.svelte file again and add the following into the script:
import { appStore } from "$lib/stores";

// ...

$: appStore.get('stats').then((value) => (stats = value));
Now, this page will display stats that are up-to-date with the key-value store.
Stats and stat? Stat and stats? Stat(s)
These components are wrappers for TailwindCSS and daisyUI class names.
Let’s start with Stats, found at $lib/Stats.svelte:
<div class={`stats border-primary border-4 shadow-lg ${$$props.class}`}><slot /></div>
Then, with Stat, found at $lib/Stat.svelte:
<script lang="ts">
    export let title: string;
    export let value: any;
    export let input = false;
</script>

<div class="stat place-items-center">
    {#if $$slots.figure}
        <div class="stat-figure text-secondary">
            <slot name="figure" />
        </div>
    {/if}
    <div class="stat-title">{title}</div>
    <div class="stat-value">
        {#if input}
            <input bind:value type="number" class="input input-ghost w-full max-w-xs text-center" />
        {:else}
            {value}
        {/if}
    </div>
</div>
We made use of the figure slot in the report page to include an icon.
The optional input prop decides if the component will take in data, or simply display the data.
Setting the Application Window Title
We can head back over to the routes/+page.svelte file and include code to update the application’s window.
We will display the phase the user is in, the time remaining, and the name of the application. Insert the following code into the file’s script tag:
<script lang="ts">
    // ...
    import { appWindow } from "@tauri-apps/api/window";
    import { phase, remaining } from "$lib/stores";

    $: parsedRemaining = [Math.floor($remaining / 60), $remaining % 60].map((n) =>
        String(n).padStart(2, "0")
    );

    $: appWindow.setTitle(`${$phase} - ${parsedRemaining.join(':')} - Tauri Pomodor`);
Hooking the stores with the Settings Page
Just like we did for the report page, we can use the store to provide the settings page with the user’s data:
onMount(async () => {
  const settings = await appStore.get("settings");

  workTime = settings.work_time;
  shortBreakTime = settings.short_break_time;
  longBreakTime = settings.long_break_time;
  longBreakInterval = settings.long_break_interval;
});
Playing a Tune when the Phase Switches
The sound files can be found in the GitHub repo, linked at the end. In $lib/PhaseSwitchSound.svelte, we can subscribe to the phase store. This means that we can play a tune whenever the phase changes.
<script lang="ts">
    import { TimePhase, phase, hasStarted } from '$lib/stores';
    import workSound from '$lib/assets/work.wav';
    import shortBreakSound from '$lib/assets/short-break.wav';
    import longBreakSound from '$lib/assets/long-break.wav';

    const sounds = {
        [TimePhase.WORK]: new Audio(workSound),
        [TimePhase.SHORT_BREAK]: new Audio(shortBreakSound),
        [TimePhase.LONG_BREAK]: new Audio(longBreakSound)
    };

    phase.subscribe((value) => {
        if (!$hasStarted) return;

        sounds[value].play();
    });
</script>
And finally, we can include this component in the layout page, so that the sound can play regardless of which page the user is on:
<PhaseSwitchSound />
Building the Desktop App
Saving the longest task for the last. There will be many tools and systems needed to build our application for platform distribution.
Well, not really. Run npm run tauri build and you’re sorted for Windows, MacOS and Linux.
Testing and Debugging
Consult the Tauri docs for information about testing your application and debugging.
Packaging and Distribution
Once you have built the application, it is ready to share with others. However, you can also get the code signed to appear more official.
Conclusion
And that’s all!
Today, we learnt how to use Rust alongside Svelte to build a Pomodoro timer application, complete with a stats report and customisable settings.
But I would encourage you to explore this application further. For example, you could add an option to set the window always on top. Or you could allow the user to create a list of tasks they can later check off when completed.
And like always, I’ve left the code on GitHub.
If you liked this article, follow and share for more.
Additional Resources
tauri-plugin-store Documentation
daisyUI Components Documentation
tauri/examples/state/main.rs at dev · tauri-apps/tauri · GitHub
Author's Note
The main problem I faced when building this application was with the timing. The main focus for this Pomodoro app was that it made use of Rust, so I wanted to use the language for all the logic. But that flooded the code with asynchrony and Tokio, and the extra code wasn’t worth it considering how simple the solution was in JavaScript.