


Hello everyone. In this article, we will explore the Genius API for music lyrics. Also, I'll be sharing a simple guide towards web scraping any website with JavaScript.
Why would you want to scrape lyrics from Genius?
First of all, there is a wide collection of lyrics available on their website for no extra cost.
The process of scraping may seem unnecessary given that there would be APIs available for similar information. However, Musixmatch - one of its biggest contenders - only provides access to 30% of lyrics for free.
This would become a problem for apps that would benefit from the full range of data. I recently built my own Auto Karaoke web app with React and the Musixmatch API. Lyrics were scrolled through in a container, but it would of course be frustrating to have only 8 out of 40 lines, for example.
Moreover, getting started with web scraping is not too difficult. So let's get started with it right now.
How to set up your scraping environment
To access the Genius API, we need user authentication. That means we'll have to create a backend API that will handle the OAuth process. A popular approach would be to use Express and NodeJS.
Our project will thus need a few NPM packages:
npm i express dotenv cheerio axios simple-oauth2 express-async-handler

npm i -D @types/express @types/simple-oauth2
Genius API Client
Sign up for an account at genius.com if you haven't already. Then, create a new API client, setting the redirect URI to "localhost:3000/auth/callback".
Now, add the client ID and client secret into the project's environment variables, in a .env file:
GENIUS_HOST=https://api.genius.com
GENIUS_CLIENT_ID=******
GENIUS_CLIENT_SECRET=******
GENIUS_HOST will be used for accessing the API's endpoints later.
HTTPS
The API docs state that "All interaction with the API must be done over HTTPS". So to use HTTPS for local development, we can install mkcert to generate the TLS certificate.
Follow the steps to create a TLS certificate for local development. Add the generated files to a keys folder in the top-level folder.
We can begin by creating a simple Express server that outputs "Hello World!":
import dotenv from "dotenv";

// Load environment variables
dotenv.config();

import express, { NextFunction, Request, Response } from "express";

const options = {
    key: fs.readFileSync("./keys/localhost-key.pem"),
    cert: fs.readFileSync("./keys/localhost.pem"),
};

const app = express();

const server = https.createServer(options, app);

const port = 3000;
const URL = `https://localhost:${port}`;

app.use(express.json());
app.use(express.urlencoded({ extended: true }));

app.get("/", (req, res) => {
    res.send("Hello World!");
});

app.use((err: Error, req: Request, res: Response, next: NextFunction) => {
    res.status(500).json({ message: err.message });
});

server.listen(port, () => {
    return console.log(`Express is listening at ${URL}`);
});
OAuth
We're using simple-oauth2 to handle authenticating users with the Genius API. Only pass in our client credentials, API endpoints and redirect URI, and we're set.
import { AuthorizationCode } from "simple-oauth2";

const client = new AuthorizationCode({
    client: {
        id: process.env.GENIUS_CLIENT_ID as string,
        secret: process.env.GENIUS_CLIENT_SECRET as string,
    },
    auth: {
        tokenHost: process.env.GENIUS_HOST as string,
        tokenPath: "/oauth/token",
        authorizePath: "/oauth/authorize",
    },
});
The OAuth flow works by the user first redirecting to the authorizePath which returns a code. Then, the code is exchanged for an access token. Finally, the user can make requests to the API with their access token.
import asyncHandler from "express-async-handler";

const redirectPath = "/auth/callback";
const redirectUri = `${URL}${redirectPath}`;

const authorizationUrl = client.authorizeURL({
    redirect_uri: redirectUri,
});

app.get("/auth", (req, res) => {
    console.log(authorizationUrl);
    res.redirect(authorizationUrl);
});

app.get(
    redirectPath,
    asyncHandler(async (req, res) => {
        const { code } = req.query;

        const options = {
            code: code as string,
            redirect_uri: redirectUri,
        };

        const token = await client.getToken(options);

        res.status(200).json(token.token.access_token);
    })
);
Note that the asyncHandler is added to asynchronous routes so that errors can be caught by the middleware we defined with app.use(...). Also, check out the docs for simple-oauth2 as it's a lighter alternative to Passport.js for solely OAuth.
How to Scrape the Web with JavaScript
The approach we're going to use in this article is to fetch the HTML page content and use a library to parse it (hence why we installed axios and cheerio ).
We can lay out a route to get the song lyrics given a user's search query:
app.post(
    "/lyrics",
    asyncHandler(async (req, res) => {
        const { q, access_token } = req.body;
        // ...
        res.status(200).json("Not implemented yet!");
    })
);
First, we'll use the query to search for a matching song. To further understand the following code, read about the API's response format.
import axios from "axios";

const apiHost = process.env.GENIUS_HOST as string;

const constructHeaders = (accessToken: string) => ({
    Authorization: `Bearer ${accessToken}`,
});

const search = async (accessToken: string, q: string) => {
    const response = await axios.get(`${apiHost}/search`, {
        params: { q },
        headers: constructHeaders(accessToken),
    });
    const data = response.data;

    if (data.meta.status !== 200) {
        throw new Error(data.meta.message);
    }

    const hits = data.response.hits;

    const firstHit = hits.find((hit: any) => hit.type === "song");

    if (!firstHit) {
        throw new Error("No song found");
    }

    return firstHit.result;
};
Once a matching song has been found, we can access the URL that contains the lyrics.
Since we're using axios and cheerio, reading the web page only takes the following lines of code:
const extractLyrics = async (url: string) => {
    const response = await axios.get(url);
    const $ = cheerio.load(response.data);
    // ...
    return "Not quite implemented yet!"
};
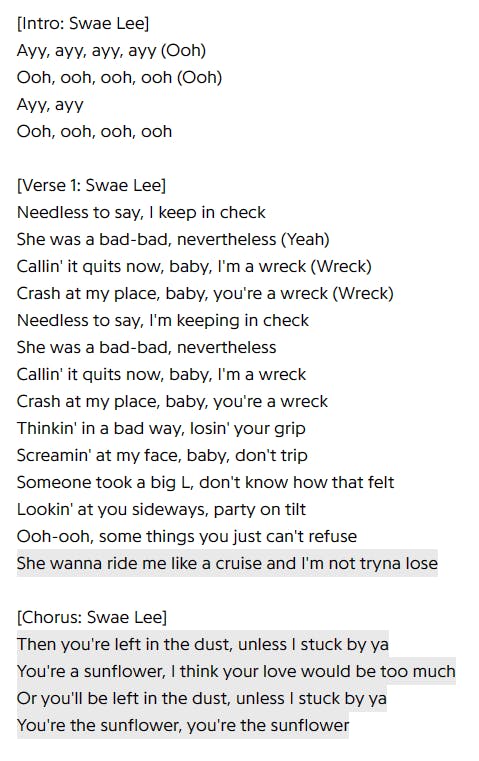
Now, to illustrate the process of extracting information, we'll use the example of "Sunflower" by Post Malone & Swae Lee. This is what the lyrics look like from the webpage.
And if we take a peek at the HTML using the browser's DevTools, we can see the following:
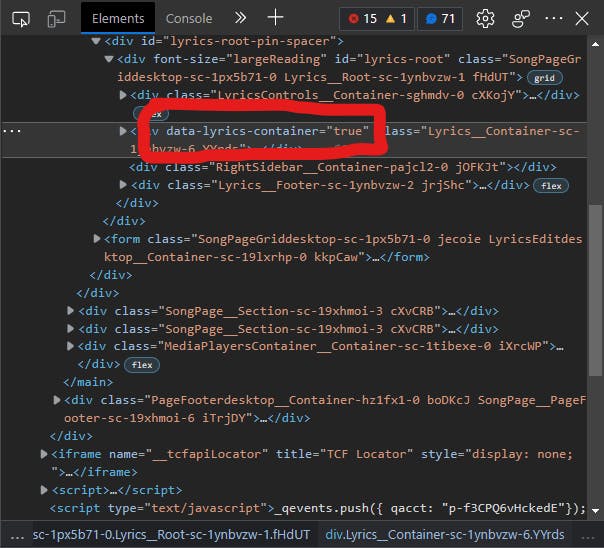
This is a clear sign that we can reference this property in our code as it is unlikely to be found anywhere else.
const lyricsContainer = $('[data-lyrics-container="true"]');
Looking back at the image of the lyrics, what features stand out to you? I would say the main ones are the headers (e.g. "[Chorus]"), the text itself, and the highlighted parts of the text. This will come in handy later.
Now let's expand the <div> in our HTML inspection.

The easiest approach to get the text would be to just get the element's text content. But if we try that, we are only left with individual lines with no spaces between them. So why is that? Well, the line breaks on the page don't convert into newlines when we get the text content. This means we will have to replace the <br>s with \n ourselves:
$("br", lyricsContainer).replaceWith("\n");
Executing this line of code will result in the following:
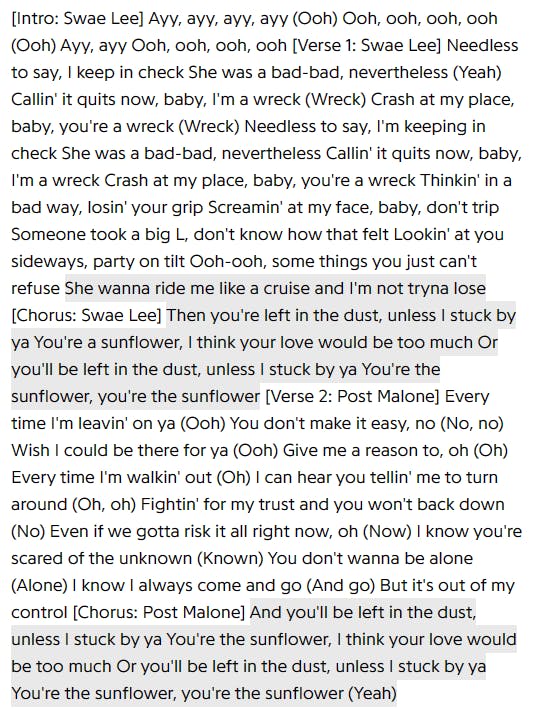
Now, I know, what happened to the spacing, even though we included newlines? Well, due to the styling of the page, newlines don't appear on the screen. As a side note, if we did want to see them, we would use white-space: pre; to bring back the spacing.
Our next obstacle is the highlighted parts of the text. If you were to go to the webpage, you would find that they contain anchor tags. All we have to do is replace all the <a> elements with their text content.
$("a", lyricsContainer).replaceWith((_i, el) => $(el).text());
This now leads to a container with the lyrics as its text content. But we could be tidy and remove all other elements that aren't text nodes from the container. This is because in some cases, those elements may contain text we don't need.
// Remove all child elements, leaving only top-level text content
lyricsContainer.children().remove();
And finally, the function returns the text content of the container. Here is the complete code:
const extractLyrics = async (url: string) => {
    const response = await axios.get(url);
    const $ = cheerio.load(response.data);

    const lyricsContainer = $('[data-lyrics-container="true"]');

    // Replace <br> with newline
    $("br", lyricsContainer).replaceWith("\n");

    // Replace the elements with their text contents
    $("a", lyricsContainer).replaceWith((_i, el) => $(el).text());

    // Remove all child elements, leaving only top-level text content
    lyricsContainer.children().remove();

    return lyricsContainer.text();
};
Back in the /lyrics route, we can bring these functions together and return the final result:
app.post(
   "/lyrics",
    asyncHandler(async (req, res) => {
        const { q, access_token } = req.body;

        const song = await search(access_token, q);

        // Parse url for lyrics with cheerio
        const lyrics = await extractLyrics(song.url);

        res.status(200).json(lyrics);
    })
);
Other Methods of Scraping Lyrics
We could have also tried out Puppeteer, a browser automation tool for NodeJS. This allows us to create a headless browser which we can also use to parse the DOM.
Although fetching the HTML page and parsing the DOM is much easier, some websites may try to block web scraping by only allowing browser access. When possible, opt to use the approach explained above as it consumes a lot less memory and time.
Troubleshoot your Scraping Process
In the context of song lyrics from Genius, there's not much hassle involved, the lyrics were contained in a conspicuous, unique [data-lyrics-container="true"] element. However, more advanced web scraping projects will require many different types of information, spanning multiple web pages.
So, when deciding which selectors to use, always look for IDs or unique attributes such as data-lyrics-container. If that's not available, opt to be specific about the elements to find, using their tag and any defining attributes. Don't rely on any class names to find specific elements if they aren't recognisable and if they look as if they've been generated. The last thing you want is to feel as if your code will need rewriting each time the website updates. Also, make sure to avoid selecting through nested structures (e.g. > div > div:nth-child(4) > p:nth-child(2) > span:nth-child(2)) as much as possible. Follow the tips given above.
Conclusion
All in all, we set up a basic HTTPS Express API, implemented authentication with OAuth and then used axios to access the Genius API and cheerio to parse the DOM content of the lyrics page. Now you should know the steps to scrape the web with efficiency. If you missed anything, the code for this article is available on GitHub.
Thanks for reading. If you liked this article, stay tuned for more.